Pages

Thursday, August 30, 2012

Choosing Paint Colors part II

And the painting continues.  Will it ever end?  Trying to look on the bright side, I just calculated the number of calories that I'm burning at everydayhealth.com.  If I paint for three hours (which is about how long it takes me to do two coats in a medium sized room by myself) I am burning around 725 calories.  Not too bad I guess.  Maybe I can have another one of those Knock You Naked Brownies I made from Pinterest tonight after all.

We have managed to nail down three more colors and get some paint up on the walls in the hallway, the first guest bedroom, and our office.  The hallway and first guest bedroom were probably the easiest paint color decisions yet.  We liked the look of our light gray hallway in our last home because it brightened up the entryway and was a nice neutral backdrop that allowed us to incorporate colors from other rooms with art and accessories.  I think it's nice when your entryway kind of ties the whole home together (at least the main living areas).  


So, we were deciding between Valspar's lunar eclipse (1) and Valspar's polar star (2).  

1

2

They look pretty similar but the lunar eclipse is slightly more brown so we settled on the polar star (4005-1A).  While I was visiting my parents and attending a bridal shower for my brother's fiancĂ© (yay!!!) this past weekend, Seth primed and painted the entire hallway.  What a great husband!  The color is pretty much what we expected but I think the cream molding with its yellow undertones is throwing the whole thing off.  Ahhhh...the molding.  The entire house is full of this yellowy cream molding color.  What ever happened to a nice, crisp, refreshing, modern white???  It's on the to do list.  We may end up hiring that awful job out.  Any takers?  :)

Here is the hallway after Seth's hard work.


You may remember that I nailed down the color scheme for our first guest bedroom when I scored an amazing deal on some nightstands here.  With the master bedroom and hallway colors chosen, I focused on a goal of mine for our new place - reducing the total number of paint colors in the house.  In our first house, we had seven different colors in basically nine rooms (four of those were shades of blue).  I never thought it looked bad, but I definitely wanted to make our color palette for the second house a bit more cohesive to allow for better flow from room to room.  I have to keep reminding myself that I can always use accessories to add different accent colors in each room to prevent them from all looking the same.  One thing I wanted to do was choose paint colors from the same paint card, just in different shades, in order to provide continuity while avoiding a boring, monochromatic palette.  So with this goal in mind, and the fact that we decided on gray walls in the first guest bedroom to complement our yellow nightstands, we just moved one shade darker on the polar star paint card and found our guest bedroom color: Valspar's gravity (4005-1B).


I tackled that project yesterday (my parents are coming for Labor Day weekend and I wanted it painted and mostly put together for their visit).  So 725 calories later, here she is.  It's reading a bit blue in the picture, but in person it's definitely more gray.


The other room that we've painted is the office (the former dining room).  The color we settled on is Benjamin Moore's Sesame 381 (color matched to Valspar paint).  


It actually turned out a bit lighter and more yellow-looking than I had hoped but it should still work.  I blame the dark green color that we painted over (although we did have the paint and primer in one).  Amos even got in on the action.  


Here is the color on the wall (next to a section of trim that we slapped a bit of white paint on just to get the effect).  


Ahhhh...the green on yellow-green combo.  Lovely.  Has anyone decided to donate their time and help paint our trim yet?  

We choose this color for the following reasons:
  • we liked it
  • it goes nicely with blues and grays (our other main wall colors in the house)
  • it works well with our current furniture for the room (white and dark brown)
  • it complements the rug we have chosen for the office (it was our living room rug in our last house - more on that in another post)
I love how bright and fun it is.  It is amazing how much larger the space feels now.  We are also considering it for the living room, but haven't decided yet.  In the meantime, I'm wondering if you can get carpel tunnel from excessive paint rolling?  (Or maybe it's the blogging.)

Thursday, August 23, 2012

Putting My Jewelry on Display

I have been eyeing jewelry display ideas on Pinterest (where else?) for awhile.  I think they're a great way to fill up wall space while clearing off and decluttering your dresser top.  I currently have a sizeable jewelry box on my dresser that is filling up fast.  I am not a fan of those huge jewelry armoires that stand on the floor and always look like they came from the Victorian era.  And...they are pricey! So, I decided that displaying most of my jewelry on the wall above my dresser might be a great solution.  Here are some of my inspiration pictures:


this is supposedly from better homes and gardens but i can't find it on their website


I really liked the third picture and how she used antique-looking knobs to hang her necklaces and bracelets on.  However, I didn't want to copy her earring display since I needed A LOT more earring display space.  I liked the photos with the mesh screen used for earring display.  Off I went to Hobby Lobby and Lowe's for supplies.  (I think Lowe's is going to put a cot out in one of their aisles for me soon.)

I came home with the following supplies:
  • assorted plain and printed scrapbook paper (from Hobby Lobby at 40% off)
  • 4 frames (from from Hobby Lobby at 50% off)
  • assorted decorative knobs (from Hobby Lobby at 50% off)
  • aluminum mesh screen (from Lowe's at 5% off with my trusty, worn-out Lowe's card)
  • bolt cutters (also 5% off since I paid with my Lowe's card)

I started by laying out the frames I had purchased (along with one I already had) so I could figure out where I wanted earrings (mesh screen) and where I wanted necklaces and bracelets (cardboard and scrapbook paper).  Then I measured and cut the screen for the earring frames.


I thought I was going to be able to use my staple gun to secure the screen, but the staples were too long and would have come through the other side (the larger earring frame had only 1/8" depth to work with).  Then I thought about regular staples, but my stapler has a curved "nose" and I couldn't get it into position.  I debated another trip out of the house to search for some sort of tack that I could hammer in to secure it, but then I decided to try the hot glue gun.  It is holding so far, but I am a bit concerned about long-term strength.  I may still search for some tacks and really secure the mesh at a later date.  

While I had the frames laid out, I also took the time to plan which pieces of scrapbook paper would go in which frames and which knobs I would use.  


I then cut cardboard (we still have quite a few boxes) and the paper to fit.  I used spray adhesive to attach the decorative paper to the cardboard.  I then used a hammer and nail to create holes through the paper and cardboard where I wanted the knobs to go.  The holes were slightly smaller than the knob shanks (I think that's the proper term) because I wanted to make sure they would be secure.  I used the bolt cutters to cut off the excess shank.  On a couple of the thicker ones I had to break out the hack saw and partially saw through it before I could use the bolt cutters to finish it off.  Then I screwed the knobs into place.  


The cut ends on the back of the knobs were quite sharp and I definitely didn't want them scratching the wall so I used some small felt pads to cover them.  


I considered using paper to lay out my frames, trace their outlines, then tape the paper on the wall and hammer away like this, but I decided that was too much work for five frames.  I would definitely recommend it for a larger group though.  

So, I just used a measuring tape and winged it.  Here she is ready and waiting for some bling.  (I'll show you more complete shots when I post the master bedroom reveal.)


And all decked out...


In hindsight, I probably should have taken the time to measure my necklaces and designed a more custom display.  In my defense, however, I had planned to hang the largest frame (in the center) vertically for long necklaces, but somehow when I was piecing together the scrapbook paper for that frame I completely forgot that plan.  It took four pieces of scrapbook paper to fill the frame and getting the design lined up properly was a bit of a pain.  So, when I realized that I had oriented the design on the scrapbook paper in a way that would kinda force me to hang it horizontally, I was super disappointed, but also unwilling to make a trip to Hobby Lobby for more paper and unwilling to start all over again.  Oh, well.  It's rare that any project I complete actually turns out how I had first imagined.  That said, I am quite pleased with the results.  Our master bedroom is really starting to come together!


Tuesday, August 21, 2012

Quick Chandelier Update

After Seth took down the old tarnished brass lighting fixture in our entryway, I started thinking about re-using it somewhere in the house.  We had already purchased new lights for the dining room, office, kitchen, entry hall, and our master bedroom so saving some money was in order.  I liked the lines of the fixture and decided it might look pretty good with a coat of spray paint in a fun color.  Spray-painted chandeliers are all over the internet - such a quick, cheap, easy update!


Our walk-in closet won the fight for old brassy's new home.  Since we had painted our accent wall navy blue and had decided to paint our closet the same very light gray that we had painted the other bedroom walls, I decided to find some navy spray paint and get to it.  I chose the darkest blue color that I could find at Lowe's.  

Not quite as dark as the Hale Navy on our accent wall, but maybe it wouldn't matter since it would be inside the walk-in closet.  (I considered using the Hale Navy to paint the chandelier but I was afraid of visible brush strokes so I went with the spray paint.)  

Here is the crappy before shot.  I forgot to get a real one prior to starting the project (because I was so excited about painting it!) so this pic is cropped from the before shot of our entry hallway when we first moved in.  You may notice that it is missing one of the candle covers (see on the left side of the pic?).  You can purchase these cheaply at your local home improvement store.  The one I purchased was about an inch too tall so I just cut it down with some scissors and put the jagged/uneven edge (created because of my poor scissor skills - I really wanted to put a "z" at the end of skills just then but I suppressed the urge) at the bottom.  It's not noticeable at all.  


Here are some "during" pics.  


I found this spray painting tip on Pinterest.  It worked pretty well except that the chandelier was so heavy it always sunk to the bottom of the box instead of hanging within it.  I was still able to spin it around from the top and spray all the sides at once though.  I just had to retouch where the bottom tip got stuck to the cardboard.  Oh, well.  Learn from my mistake: Even if you use the cardboard box trick, spray paint "drift" will still get on the driveway so best to move it into the grass where the paint will get cut off as the grass grows.  I have now invested in a wire brush and special cleaner meant to get rid of graffiti in order to fix my mistake.  :(


And here is the finished project with new, cute, round light bulbs instead of the "fake-flame" bent tip ones.  I haven't yet decided if I will put the crystals back on it.  Any suggestions?


I like the way it turned out except I do wish it was darker and matched the Hale Navy better.  This is another one of my "issues" - matching.  I still have a very very difficult time wearing silver and gold or black and brown together.  Silly, I know.  Maybe I can move past it one day with some professional help.


I'll post some pics once it's in place and I'll let you know if I decide to try brushing on the Hale Navy over the spray paint.  I'll probably just make Seth stand in the closet on a step stool holding it up for 20 minutes while I compare it to the accent wall.  Maybe since the closet is so enclosed, the chandelier will appear darker.  We'll see.  
  

Monday, August 20, 2012

A Happy Color, A Happy Me

I get many emails from various furniture and home decor stores.  They crowd my inbox and sometimes irritate and aggravate me, but I never unsubscribe from them.  Mainly because sometimes they lead to super duper deals like the one I got this weekend.  Let me tell you the story.

We have decided to go with a yellow, white, and gray theme in our first guest bedroom.  I know that the yellow and gray combo has been popular now for awhile and maybe it's getting "old", but I still love it.  And that's what matters, right?  I believe that you should love your own home and not get too wrapped up in color trends and design rules all the time (even though a few rules never hurt anyone).

So far, we have purchased these striped sheets from West Elm.


Aren't they lovely?  Along with my tree adoration, I have a thing for stripes.  Case in point - our old entryway runner and our old office rugs.  


Hmmm..maybe I had previously limited my stripe procurement to rugs.  Now things are about to get craaaazzzy.

We also have a white duvet cover to go in that guest bedroom.  I know some people might think white bedding (esp for the duvet cover) is crazy but I like it because you can bleach it!  I also like it because Amos has white and tan hair.  We used to have a plum colored duvet cover and it really showed his hair.  I don't know of any color that could camouflage Amos' hair, Rafie's orange tabby hair, and Cooter's gray tabby hair.  If you do, please let me know.

Let me get back on track.  On Friday, I received one of those pesky emails from Home Decorators stating that they were having an extra 20% off of their already reduced warehouse items.  So, I clicked on the link and started browsing.  Most of their furniture is much too stuffy and traditional for me, but then, I spotted this nightstand.


Gorgeous, right?  Funky/eclectic, charming, sunny yellow, and curvy in all the right places. Magnifique!  But the best part...the price.  Here is the breakdown.

Original price $179
Marked down to $84.99
Extra 20% off = $67.99

Woohoo.  That's a 52% savings!  So...I got Seth's approval and we ordered 2.  But that's not the end of the story.  Today, I get an email (on the last day of the extra 20% off) saying that they are offering free shipping.  So, I get on the website and investigate.  Now, you can order the nightstand and get FREE SHIPPING!  I loathe shipping charges.  I guess they are a necessary evil, but the store tricks you into thinking you are getting a great deal and then they pile on the shipping fees.  The shipping for the nightstands was $25 each.  Bluh.  I called them and told them to either give me free shipping on the order I had placed Saturday or just cancel it and I would re-order today to get the free shipping.  So, they credited me the $50 in shipping charges and the $4.88 in tax on the shipping!  Yay!!!

So for a grand total of $149.24 we will have two nightstands for our guest bedroom that will add a splendid pop of sunny yellow.  If I had purchased these at the original price (which I would not have done obviously), I would have spent over $400 for both of them, their shipping, and the tax.  I WILL TAKE IT.  I could probably have found something on craigslist, ebay, or at a thrift store for cheaper but I suspect that I would not have found something with such a unique design, might not have found two that matched (which I can live with but Seth has issues with - which is super unexpected if you know our personalities), might not be getting great quality, and would still have had to spend money (albeit not much) on paint to refinish them.  And, of course, there is the time I would have spent working on them that I will save and use for another project.  :)

I'm happy.  Now who wants to come stay in our guest room and use these babies?


Thursday, August 16, 2012

I've Got the Blues

Whew.  The paint decisions continue.  For those of you that know me, I am not always the best decision-maker.  The people in the paint department at Lowe's have found that out pretty quickly.  They are about tired of mixing up samples for me.  They see me coming from a mile away and fight with each other about who will have to mix paint for the crazy lady who can't actually commit to buying a full gallon.  Don't worry - the commitment issue seems to be restricted to paint colors.

My biggest challenge has been the decrease in natural light in this house versus our old house.  :(  I'm trying not to be too sad about it.  I mean, I LOVE trees in the yard (as I believe I've mentioned before and will probably mention again).  I have a tree fetish (that is, until Fall rolls around).  I imagine a tree-filled lot and beams of sunshine streaming in through every window don't always go hand in hand.  "You can't al-ways get what you wa-ah-ahnt" as my mother and Mick Jagger would say sing.

The problem comes when I see a color on a paint card, in a photo of a room online, etc and get it firmly planted in my mind that that specific color would be perfect in our fill-in-the-blank room.  Unfortunately, there are so many factors that influence how that color will actually read in your space.  I  knew that already, but I also found out just how true it is.  I thought we were doing the right thing - buying samples, leaving them up for days, and looking at them throughout the day in all different kinds of light.  But after slaving away last weekend (I mean, I was sweating and not looking remotely attractive with my roller in hand) to paint our large formal living room turned dining room, I decided that I just couldn't live with the color that we picked.  It seemed like it was going to be alright as we were rolling it on but after it dried I wasn't so sure about it.  Let me refresh your memory.


It actually looks better in this photo than in person.  In person, it appears almost a bit purple.  The main problem is that the color doesn't match the amazing rug that I fell in love with and recently purchased from West Elm (at 30% off by the way!!!).
A side note about West Elm - if you can, definitely hold out for their rotating 20% off sales.  I also applied a 10% off coupon to the rug purchase and Seth and I scored a ton of new lighting for our new pad during the 20% off lighting sale a couple months ago.


The Evening Eclipse looked like it would match fine when we held the paint card next to the rug (or we wouldn't have chosen it).  It even seemed ok when we painted our test square on the wall.  I guess our lighting or our eyes or something deceived us.  Because the blues in the rug are much more gray.  So...I broke the news to Seth and we have been hunting down a better color ever since.  I'll let you know when we find "the one".

Tuesday, August 14, 2012

A Lucky Find

This past weekend, Seth and I got around to placing some of our outdoor furniture on the front porch.  The porch at our first house was larger and was able to hold our bench/chair/coffee table/side table set from World Market, our homemade plant stand (a project that taught us building things together was not good for our marriage; however, we may try again), and a bistro set that we purchased at Lowe's.  We are fine with paring things down since we never used all those seats anyhow.  When we first moved in, we had the movers place the bistro set on one side of the front porch and the plant stand on the other.  After considering the comfort level of the furniture this weekend, though, we changed things out, and were able to fit our World Market set and the plant stand no problem.

The bistro set will just have to sit in the carport for now.  Poor guy.


We also have an outdoor dining table set (that we purchased with some wedding money a couple years ago) that used to have a perfect spot at the old house but is now sitting randomly under some trees in our new backyard.  The goal is to one day build a patio (like this amazing one that Sherry and John Petersik from Young House Love built)


or a platform deck like this.

Anyway, enough dreaming and back to reality.  The front porch looked something like this after Seth and I arranged it.


(I'll admit that I did not actually get photos from the weekend and the rug was originally on the side with the bench/coffee table.  These photos were taken after I moved it today - for the reason you will read below.)

You probably won't believe it, but it was actually Seth that said it before I did.  "Wouldn't it look better with a rug on both sides?"  Yes! Of course it would.  Now where could we find an inexpensive rug that looked ok paired with our current rug???  We purchased the current rug on sale at Crate&Barrel last year and didn't really want to pay full price for another one.  Lucky us, as we were walking through Lowe's the other day, we spotted this beauty (sorry for the picture afterthought).  


It comes in two sizes: 5'3"x7'3" and an even larger size (would give you dimensions if I could remember them).  It was the twin to our current rug, albeit a fraternal twin and not an identical one, but we didn't care.  It was also larger than our current one (but would still fit on the porch) and $20 cheaper than the full price C&B one.  Score!  

But then...we couldn't find it.  There was one of the larger size, but none of the size we wanted.  Boo.  We asked a salesperson and after looking it up on the computer, he said one should be delivered to the store on Monday.  Yay!  So, I grabbed our 10% off coupon and headed to Lowe's for the rug yesterday.  And........it wasn't there.  The salesperson said it had shipped out and should arrive at the store later that night or Tuesday.  Fine.  So, I grabbed our 10% off coupon and headed to Lowe's again today.  And it was finally there!  Here it is in its new home (with Amos critiquing my work).


And the old rug on the other side.


Don't they look pretty darn similar?


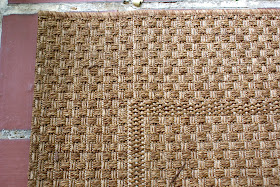
If you get close up, you can definitely tell more of a difference, but that's ok.  


It's close enough for us.  :)  I'm glad we now have our furniture set up and ready for some relaxing on the porch.  Maybe we'll sip on some semi-sweet tea, too (can't handle the syrupy-sweet kind).  If only those pesky mosquitoes would stay away.