Pages

Monday, November 26, 2012

I Love Organization

Yes, I do.  Does that mean that in my house there is "a place for everything and everything in its place"?  Heck no.  I have kind of a love/hate relationship with that saying.  It certainly sounds wonderful and for maybe a split second it sounds attainable.  I'm pretty convinced that it's not though.  We don't even have children yet.  If we can't make it work now, I'm pretty sure there is no hope for complete organization in our future.  That may sound pessimistic to you, but to me it's just being real.  Despite my belief that I won't ever have everything in my house organized, I still forge ahead and complete small organization projects as I have the time.  Recently, Seth and I tackled two such projects.

First, Seth organized our broom cupboard.  I forgot to take a before picture, but just close your eyes and imagine the broom, the mop, the steam mop, the fan duster, the swiffer, and other various cleaning tools piled up in there.  Removing any of the aforementioned tools from the cupboard caused an avalanche to ensue.  I was getting pretty sick of dodging falling cleaning devices while picking through everything to find the tool that I needed. (Does that make it sound like I clean the house all the time?  Haha.  We'll just pretend.)

We also wanted to store our ironing board in this cupboard since it is in close proximity to the kitchen where our washer/dryer and iron are located.  The most logical place for it seemed to be on the inside of the door so I ordered this ironing board holder from Crate & Barrel because I loved it's sleek, minimalistic design.  Yes, I loved the design of an ironing board holder.  I'm weird like that.  However, it arrived, Seth installed it, and we realized that it wasn't going to work.  The ironing board was hanging too low and we could no longer close the cabinet door.  On to the next possible solution.  Seth found the hooks pictured below at Lowe's for super cheap and voila.


No, they are not sleek and pretty like the holder from Crate & Barrel but they are cheap and functional so I am happy.  The next step was getting the broom, mop, swiffer, and fan blade duster off the floor of the cupboard to keep them from piling on top of one another. We purchased a simple organizer with adjustable clips that you can pop the handles in and out of.  


For the dustpan, the lint roller, and our small dusters we took advantage of the pegboard already in place and hung them on hooks.


And...done.  It's the simple things that make me happy.


The second project was organizing the chaos that was our toolbox.  I took this challenge on one afternoon while watching some television.


We had tools and nails and drill bits and other random things covering the console table in our entryway.  It had become our tool table and it was ugly.  I should have taken a picture for you.  Maybe I was just too self-conscious about it to do so.  I'll try to work toward full disclosure from now on.

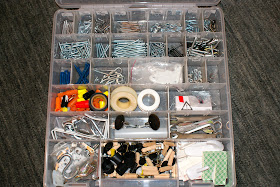
I purchased a clear organizer meant for jewelry at Jo-Ann's a few weeks ago thinking it would be perfect to organize all of our stray hardware.  It has dividers that you insert as needed to make custom-sized compartments.  First, I spread everything out on the floor to better assess the situation.


Then, I just started putting things into compartments, using the dividers as needed.  I used white labels that I had on hand to record any known information about our collection of nails and screws.  Sometimes, I just labelled the compartment "miscellaneous fill-in-the-blank (screws, nails, etc)" or "extra furniture parts".  Nothing too fancy here.


It turned out that I had just enough space for everything.  


And with all of those random pieces and parts cleared out of the toolbox, I was easily able to empty it out completely and wipe away the dust and grime.  


Ahhhhhh....soooo much better.  I gave Seth a tutorial on where everything in the toolbox is supposed to live now.  We'll see how long this lasts.  :)

Does anyone else get that extremely happy, weight-has-been-lifted, I-can-conquer-the-world feeling after an organization project?  Just me?

Friday, November 16, 2012

DIY Dining Room Art

We have a lot of wall space in this new house, which may sound like a good thing at first, but when you are trying to fill it up and make it all "homey" it can get pricey.  Trying my luck at making my own art was an easy decision.  That being said, some of us are gifted in drawing and painting and some of us are just...not.  God gave me a brain for science and not for the arts.  I've tried some abstract paintings in the past and they did not turn out well.  I may try again some day, but for now I'm sticking to typography and other "crafty" art projects.  

First, let me entice you with a picture of the finished art wall.


The object on the left side that got cut off is a lamp.  I wanted to give you a close look so it's other half was sacrificed for this pic.  I'll take you through the pieces one by one.

(Ahhh...there's the lamp)

  1. These are cardboard letters from Hobby Lobby that I spray painted with metallic silver paint.  Many people have done this all in the name of trying to "steal" the look of the famous Anthropologie zinc ones.  Yes, these are roughly a foot tall and Anthro's are twice that but mine were $2.49 each (plus some spray paint) and Anthro's are $98 each.  Yeah, I'll take the small cardboard version thankyouverymuch.  I went back and forth about what to spell out...yum?  eat? drink?  dine?  So many options.  I eventually settled on pork.  For those of you that know Seth and I personally, no explanation is needed.  For those of you that stumbled across this blog and are wondering why pork, I'll just say for now that we have ties to the pork industry.  
  2. This is actually not a DIY project.  I purchased this print awhile back from 20x200.com.  Their motto is "art for everyone" with 8x10 prints starting at just $24.  I definitely recommend checking them out.
  3. Again, this is not a DIY project.  It is the "Wire Guy" from CB2.  I had been admiring him for awhile and just before we moved, he went on sale so I snatched him up.  He just looks so content with what I imagine is a belly full of delicious food.  Perfect for a dining room, right?
  4. This piece is some pear string art that I whipped up.  I was inspired by this.  I'm thinking that a letter or number (or ampersand like my inspiration) definitely has a bit more impact.  The pear kind of looks like a blob.  Oh, well.  I'm leaving it alone for now.  (Tutorial below)
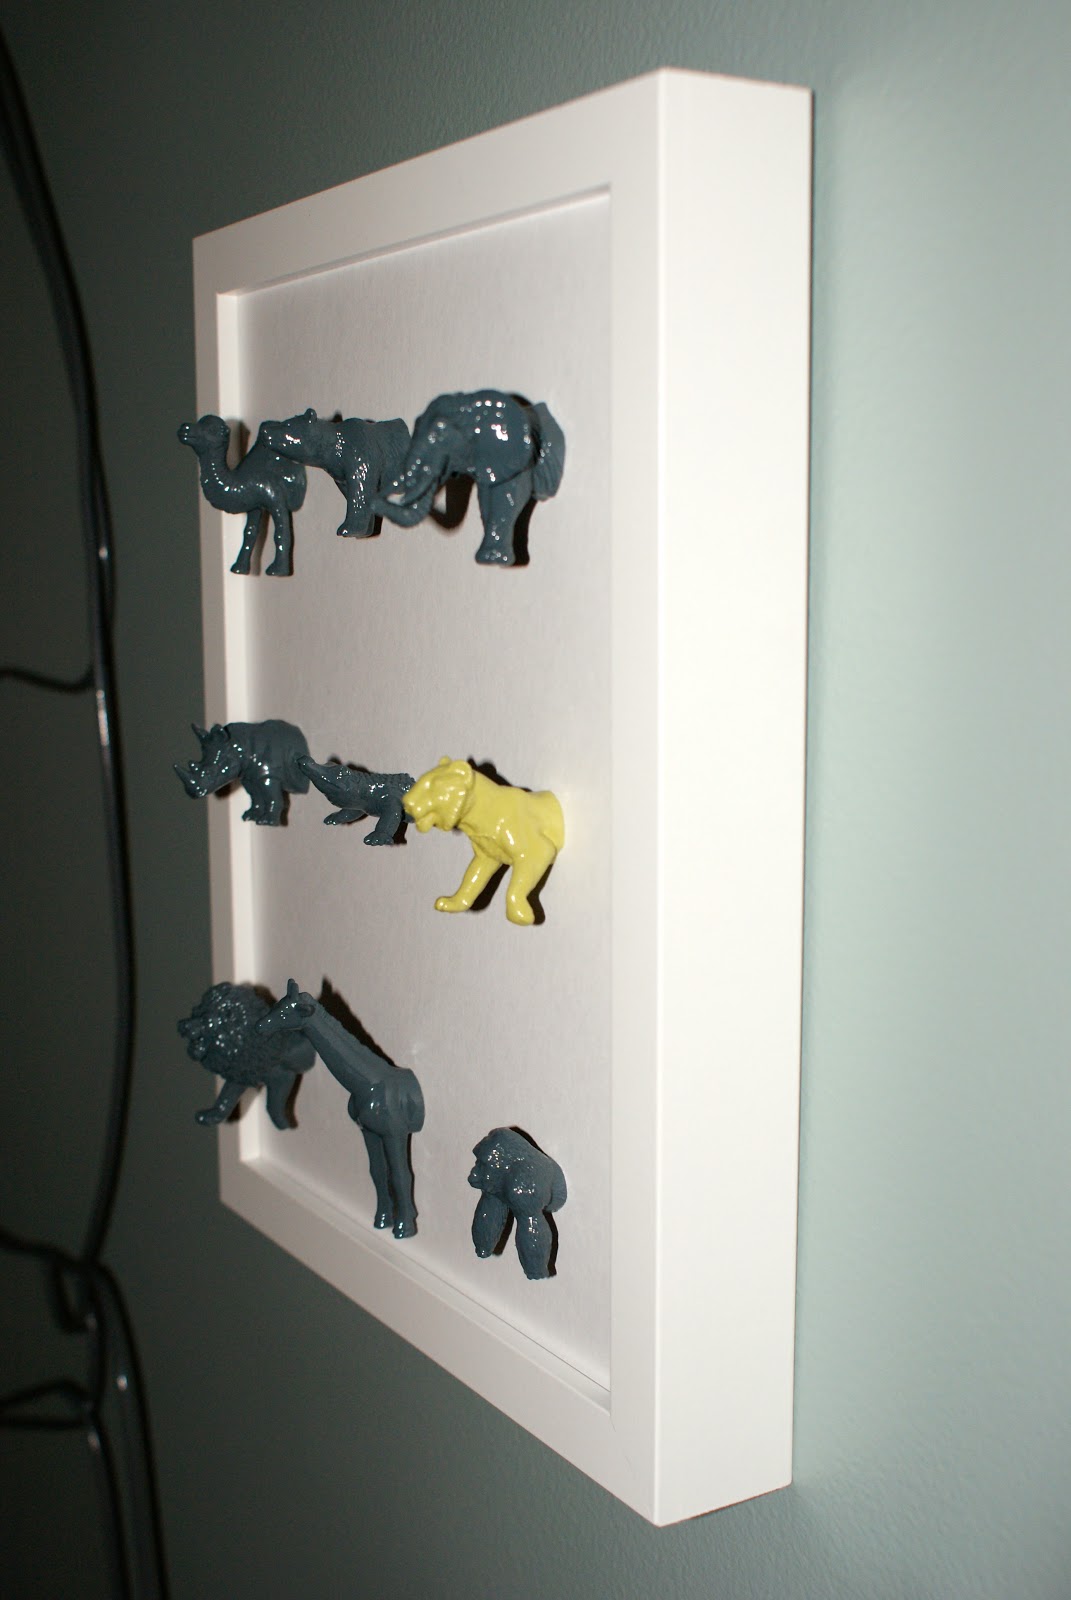
  5. I am in LOVE with this project.  Those are spray painted, mounted plastic animal heads.  Yaaaah!  I'm giddy over it.  Mandy over at The Haps is a genius.  You may think I'm weird but as you can see I'm not alone.  Jessie at Cape 27 also made one for her daughter Zoey's room and Jessie claims to love it more than Zoey.  (Tutorial and close ups below)


Now for the tutorials.  The pear string art is pretty straight forward.  You'll need:
  • a picture frame
  • a thin piece of wood cut to fit your frame
  • some embroidery floss, string, whatever you'd like
  • some small nails
  • a hammer
  • a silhouette/outline of your choice


I spray painted my piece of wood white after it was cut down to size and sanded lightly.  I googled pear silhouette and saved one that I liked.  I enlarged it in word and printed it out.  After cutting it out carefully, I used some tape to secure it to the wood trying my best to center it.  Then I started hammering in tiny nails around the silhouette.  I used quite a few nails, probably one every centimeter or so because my shape was curvy and I didn't want the curves getting "cut off" when I started stringing and becoming huge angles.  A pear is supposed to be curvy after all.


Once all of the nails were in place (I had a couple that kept wanting to pop back out), I used my string to outline the shape first.  Then I started filling in by randomly stringing across the image.  I just stopped  and knotted off the string when I decided it was done.  


I used some jute twine that I had on hand for the stem (after I untwisted and separated to get a thin strand).  And that's all there is to it.


And now for the animal heads....


For this art project you'll need:
  • a picture frame
  • cardstock
  • super glue
  • some plastic animals
  • spray paint
  • a knife
  • a cutting board
  • a pot with boiling water (optional)

After a lot of searching (Wal-Mart, Target, The Dollar Tree, Kroger, Joann's) I finally found a pack of plastic animals at Hobby Lobby.  They actually came in a fun tube that had a globe on top that you could spin around.  I am easily entertained.  And they have millions of these tubes with all sorts of different creatures inside of them.  I believe it was around $8 for the tube with the twelve jungle animals in it.  I also used my weekly 40% off coupon so it was probably just over $5 with tax.  Not too bad for a dozen safari animals.  After reading Mandy's tutorial and her comment section, I decided to try boiling the animals in water for a bit to soften them up before attempting to cut them in half.  


This worked really well.  I think I boiled them for about 5 minutes and the knife sliced through them like buttah (well, almost).


Is anyone a bit disturbed by this?  If so, I apologize.  I would never do this to a real animal. I promise.  And besides...a real jungle animal wouldn't let me close enough to try anyway. I jest.  I am not about to go roaring through the jungle wielding a large knife looking for victims.  Don't worry.


I cut nine of the twelve animals for this project and plan to save the other three for something else.  I then moved the heads outside to begin spray painting.


The lion's mane was weighing him down a bit so I used a couple of push pins to support him.  


Seth actually suggested picking out one animal to spray paint a different color and I chose the tiger.  War Eagle!  :)


I gave them multiple thin coats until they were fully colored.  I let them dry overnight and then mounted them to a piece of cardstock with super glue.  


They rested laying down flat for another 24 hours before I got the courage to put them in the frame and hang it.  I still have a fear that one of them is going to take a nose dive one day.  Super glue don't fail me now.  Seth has a fear the someone is going to brush up against them and knock one off.  I guess we'll see which (if either) happens first.  


Some of you out there might be wondering what I did with the animal butts.  I saved them, of course.  Multiple readers on Mandy's blog asked her what she was doing with hers and many even gave suggestions from making animal butt magnets to repeating the same art project with the butts and hanging it in the bathroom.  One reader even suggested including a reference to wiping.  I am not sure what I'll do yet, but I definitely laughed out loud and LOVED the cheekiness of the animal butts/don't forget to wipe your butt thing in the bathroom.  


I'm quite pleased with the way the projects turned out.  They were fairly inexpensive, they are filling up some wall space, and they are personal since I made most of them.  Check, check, and check.  Now on to filling up the walls in all the other parts of the house.

Has anyone else attempted their own art project?  How did it turn out?  Any other suggestions on what to do with the animal butts?

Friday, November 9, 2012

We Bought a Couch!

Since leaving for college over 10 years ago, I've only had thrifted or hand-me-down couches.  They have mostly been in good condition with little odor (yay!) and usually from people that I know so I'm not complaining.  I'm just never quite sure what has happened on these couches in their previous lives (yikes!) so I have been looking forward to the day when Seth and I could afford our very own brand spankin' new couch.  Well, ladies and gents...that day has finally arrived.  

Our style is fairly modern and we like furniture with clean lines so we have been having a horribly difficult time finding the couch for us.  Most of our local furniture stores carry more traditional, overstuffed pieces and have very few modern options.  I had been eyeing a couple of couches online - namely the Klyne sofa from Crate and Barrel and the Karlstad from Ikea.  


The Klyne sofa has just the shape that we were looking for but it comes at a price.  $1199 to be exact.  Plus $280 for shipping.  A bit steep for us.


The Karlstad is more affordable at $499 plus $350 for shipping.  I was also hoping that maybe we could squeeze him into our car and avoid the shipping costs.  He was extra enticing because he has removable, washable slip covers.  With three animals and possibly future children, that sounded great to me.  Also, two blogger families that I follow (John & Sherry Petersik from Young House Love and Gemma & Dan from The Sweetest Digs) own the Karlstad and both seem very happy with it.  It also looks quite nice in their homes. (If you're interested John & Sherry discuss their purchase here and here.  And here is a pic of Karl in Gemma & Dan's home.)  

So, we had it all planned out that I would call Ikea and ask them for the dimensions of the boxes to see if it would fit into our car.  Meanwhile, commercials for a furniture store a bit down the road from Jackson kept popping up on television and after asking a few of our friends, we decided to check it out before our trip to the A-T-L.  Again, it mostly had traditional pieces.  Boo.  But then we stumbled upon this beauty.  


It's the Mitchell sofa from Rowe.  After some contemplation, we decided to go for it.  Its price point was in between the Klyne and the Karlstad and we decided it was doable.  I like Ikea, don't get me wrong, but I did have a little hesitation about the quality of the Karlstad and how well it would hold up over many years.  Also, if we didn't fit the Karlstad into our car and had to pay shipping it would almost have been a wash as far as price goes so we opted to pay a bit more for a Rowe piece.

We are currently anxiously awaiting the call saying that she is ready for us.  We ordered her without the nailhead trim (Seth isn't a fan), in the deep gray textured material below, and with espresso stained legs.  Yum!  I can't wait for her to get here.  Our first "real" couch.  


Has anyone else invested in a nice piece of upholstered furniture?  Living room chairs are next on our list.

Tuesday, November 6, 2012

A Thrift Store Score

I poke around thrift stores occasionally.  Usually, I leave empty handed.  I have never quite understood how some people can go in a thrift store and find an amazing piece of furniture for pennies.  I'm chalking it up to the fact that they generally live in larger cities and the selection of merchandise must be better and must change more frequently.

However, I did visit a thrift store a week or so ago and found what I think is a great deal. It was buried behind some other artwork, so I dug it out and stared at it for awhile before deciding for sure that it needed to come home with me.


It is one of the largest pieces of artwork that I've ever seen outside of an art museum.  It measures almost 30"x60"!  In the above photo, it is propped up against the pillows on our guest bed.  


And it was $19.98.  You may think I'm crazy since it's really not much to look at now (my apologies to the artist).  The painting itself certainly isn't our style but I've been inspired by all of the thrift store art projects on the web these days and I know I can turn it into something great.  Check out what other creative bloggers have done with theirs.


before


There are just so many ways that you can spruce up thrift store art.  You can't go wrong snatching up a cheap framed piece and redoing it to fit your design needs.  I'm not sure exactly what I'm going to do with mine yet, but I'll let you know where I end up.  

Has anyone else tried their hand at some sprucing up a thrift store find?  I'd love to hear how it turned out and see some pics!