So, since Thanksgiving and Christmas were again on the horizon, I convinced Seth to help me tackle a DIY mantel.
If you follow along with us here at Some Like A Project, you may have picked up on the fact that we are drawn to clean lines and prefer what I call a modern organic style (although I also like a bit of glam and industrial and eclectic and...ok, I like it all). A quick search of my design boards on Pinterest revealed this pin, this pin, and this pin. Revisiting these gorgeous images cemented my desire for a floating wooden mantel.
Using painters tape, we outlined a mantel on our fireplace to help us better visualize what we wanted so that we could determine our dimensions. We made sure that the bottom of the mantel was at least 12 inches above the fireplace opening (to avoid a fire hazard from excessive heat exposure).
For the length, we settled on halfway between the fireplace opening and the end of the brick, making our mantel 60 inches long.
A quick trip to Lowe's and we were ready to start building.
We used the following supplies:
- two 1x6's
- one 1x4
- scrap wood
- miter saw (or circular saw)
- six L brackets
- wood screws
- cordless drill
- countersink drill bit
- wood filler
- sand paper
- wood stain
- polyurethane
- hammer drill
- 1/4" by 4" tapcon concrete screws
- tapcon concrete drill bit
- level
We cut our two 1x6's and our 1x4 to 60 inches in length. Using the L brackets, we assembled the top, bottom, and front of our mantel.
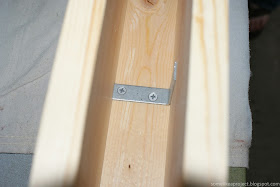
It was at this point that we realized our L brackets were too long (see how the board on the left is actually sitting on top of the L bracket that is attached to the board on the right?).
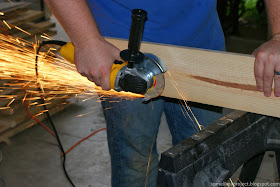
Thankfully, the angle grinder took care of that problem. We just ground off half of the L bracket leaving one screw hole instead of two.
To ensure that the front of your mantel is "seamless", attach the top and bottom pieces of the mantel to the backside of the front piece (instead of attaching them to the top and bottom of the front piece).
We then cut pieces for the sides from some scrap wood and attached them with wood screws.
We used a countersink drill bit since we didn't want any visible screw heads on our floating mantel. We applied some wood filler on top of the screw heads, let it dry, and sanded it smooth.
No seams on the front:
I used Minwax's dark walnut wood stain again so the mantel would match our console table topper.
Next, we turned our attention to the support structure. The long piece of wood is what would actually be secured to the fireplace itself using concrete screws. We wanted a really snug fit, so we cut ours to 60 inches minus the thickness of both the side pieces (I think it was 57 inches). We attached four pieces of scrap wood to our board to provide extra support.
We used a hammer drill with a tapcon concrete drill bit to make our holes in the mortar. I think the hammer drill is Seth's new favorite tool.
(*Note: We are amassing quite a tool collection. Tools are not cheap. We think long and hard before investing in a new toy tool and ask ourselves things like, "Is it absolutely necessary to complete this project?", "Can we borrow it from someone instead of purchasing it?", and "Do we know of another project on the horizon where it will be needed again?". For this project, we tried to use our cordless drill with a tapcon concrete bit and failed miserably. We also know of another project that we will be tackling soon where a hammer drill will be needed and so we bit the bullet and purchased the hammer drill.)
We then mounted the frame and secured it with tapcon concrete screws.
Then it was finally time to bring in the mantel!
Whew...it fit like a glove. We used wood screws and our countersink bit again to secure the mantel to the frame.
After another round of wood filler and sanding, we applied two coats of polyurethane and she was done.
I can not wait to decorate her for Fall. We've been busy with a few other projects this weekend, but mantel decorating is up next. Fred the moose will be finding a new home and an antiqued mirror that I made from glass will be replacing him. I'll have pictures of the mirror and a tutorial post soon. Here are some Fall mantels that are inspiring me: 1, 2, and 3. Stick around to see how mine turns out!


Nice mantel! In the picture of the mantel going on the support, it looks as if there are additional internal supports that you didn't show. Did you put those in just like the end pieces? I noticed they were cut back to accommodate the support beam. Can you discuss how you figured this out? Thanks!
ReplyDeleteAnna - Yes, you're right. The middle of the mantel was trying to bow inward some and so we decided to use some scrap wood to help keep it level. We cut maybe 4 pieces (allowing for them to be inset enough so as not to interfere with the support beam as you astutely noticed) and just shoved them inside the mantel. We also made sure to stagger them so that they would sit in between the supports coming from the beam. We didn't bother securing them with nails or screws because it was quite a snug fit. Hope that helps! Sorry I forgot to mention that. :)
DeleteSandra,
ReplyDeleteThis is exactly what I have been looking for! Thanks for sharing it! A couple of questions for you. What size was the main support piece that you screwed into the brick? From my calculations I came up with 2x2. Does that even exist? And what size were the small supports that you used inside and for the sides of the mantel?
Thanks, Lauren
I'm so sorry that I missed this comment, Lauren. I assume you don't need me to answer anymore. I hope your mantel turned out great!
DeleteHow did you get the wood filler to take stain? I used the elmer wood putty but everywhere it us, the stain is much lighter than on the wood. I followed your instructions and the mantel turned out wonderful except as noted above.
ReplyDeleteThans, Mickie
I'm sorry I haven't responded to your comment, Mickie. I had the same problem. I just let the wood stain sit a lot longer on the wood filled areas and applied extra coats of stain just to those areas until it darkened up.
DeleteBuilt a mantel based on this design this weekend and it turned out wonderfully! Hopefully I'll post the pics on my blog: www.jonlikestodraw.com
ReplyDeleteThanks for the idea!
Download 16,000 Woodworking Plans & Projects
ReplyDeletehttp://woodworkingplanspro.weebly.com
16,000 Woodworking Plans With Step-By-Step Details, Photos, Materials Lists And More!
Hope it will help you next time !
Hey there! Just stumbled upon your blog, and I couldn't resist dropping a comment after reading your article on how you built that amazing floating fireplace mantel. First off, hats off to you for taking on such a cool DIY project and turning it into a masterpiece! Your step-by-step guide was a lifesaver for someone like me who's always wanted to add a touch of elegance to their living room but has been too intimidated to tackle carpentry. Your friendly tone and detailed instructions made it feel like even a rookie like me could give it a shot.
ReplyDeleteThe hammer drill is a versatile tool, essential for any DIY enthusiast or professional. Its dual-action mechanism combines rotary drilling with a pulsating hammering action, making it ideal for tough materials like concrete and masonry. With variable speed settings and ergonomic design, it's both powerful and user-friendly, making drilling tasks efficient and precise. AG-DRILL's hammer drill is a game-changer! Its robust design and powerful performance make drilling through tough surfaces a breeze. Whether it's concrete, brick, or stone, this tool gets the job done efficiently.
ReplyDeleteI love how this DIY mantel complements your modern organic style.
ReplyDeleteThis comment has been removed by the author.
ReplyDeleteI really appreciate this article! I’ve been struggling to find the perfect Custom Fireplace Cabinets, and your suggestions gave me the inspiration I needed.
ReplyDelete