Pages

Tuesday, December 31, 2013

Guest Bathroom Inspiration

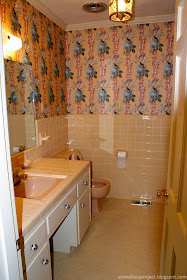
One of two spaces that we haven't really touched in the house is our guest bathroom.


We inherited some amazing peach colored floral wallpaper, a peachy-pink toilet (and sink and bathtub), and TONS of tan tile.  Also, those painted vanity knobs.  They are dangerous.  The middle one has snagged my jeans on multiple occasions.  (Why haven't I removed them yet?)

After almost a year and a half of enjoying our retro bathroom, I have put together a couple of mood boards to kick off the makeover.  Notice that I used the word "makeover" and not "renovation". That's because a reno is out of reach for us right now.  If we weren't dealing with half-tiled walls, it would be a lot easier.  I fear that behind that tile is an inch of mortar embedded in wire mesh (kind of like what John and Sherry uncovered in their first house).  This makeover will be a bandaid until we can afford a full reno.

I'm thinking something like this...

Guest Bathroom Mood Board1  //  2  //  3  //  4  //  5  //  6  //  7  //  8  //  9  //  10

or like this...

Guest Bathroom Mood Board 2
1  //  2  //  3  //  4  //  5  //  6  //  7  //  8  //  9  //  10


The background for these mood boards is Benjamin Moore's Emerald Vapor, which I am considering for the wall color.  The teal chevron fabric and the teal ikat fabric (both #5s) are what I'm considering for the shower curtain.  For the artwork I'm torn between two Michelle Armas prints (#3 in both mood boards).  I will wait to decide on the vanity color and knobs (#s 8-10 in both boards) until after I finalize the shower curtain fabric and which print I will use.  I am pretty set on the mirror - just waiting to find a discount code before I order it.

Three additional projects that I'd like to tackle are refinishing the peachy-pink bathtub, replacing or refinishing the peachy-pink sink (and replacing the faucet), and adding shelves to the middle of the vanity for extra storage (like John and Sherry just did in their master bathroom).  I'm pretty sure that our tub is cast iron (i.e. not fiberglass) so I'd like to salvage it if possible.  Does anyone have experience with tub reglazing? Does it hold up?

I'm setting the goal of finishing this project by the end of February.  I think that's reasonable.  I'll keep you posted!
Thursday, December 26, 2013

Merry {late} Christmas!
I hope everyone had an amazing Christmas!  I've been working the past 5 days so we will be celebrating tomorrow. My parents are headed our way right now and I can't wait to spend some time with them!  Better late than never, right?


Thursday, December 19, 2013

Our Christmas Tree

I have a confession.  I lost steam on the Christmas decorating.  Remember how I was all on top of things at the end of November?  Whelp…that was the beginning and the end of that.  Ever since, the Christmas decorating has been moving at a snail's pace.  I lost motivation.  I ran out of time.  I had grand plans.  Blah blah blah.  Maybe next year.

I've been feeling really down and out about the whole thing.  I've been feeling like I've let all 5 of my readers down.  And I've been feeling like my house and home decor just don't measure up (that's what happens when you subscribe to too many blogs written by too many uber talented women).  But then I read this amazing post from Ashley and I felt instantly better.

It's easy to get down on yourself and critique your less-than-perfect home when your inbox is flooded with picture-perfect, clutter-free, bright-and-shiny Christmas home tours from every home design blogger in America.  But you know what?  It's okay to push more important things up your to do list.  Whatever they may be.  For me, relaxing, de-stressing, and sleeping took precedence over making more ornaments for our tree or creating the perfect Christmas tablescape.  And I'm trying not to be sorry about it.

Our tree has been up since the end of November but it just hasn't been finished.  I am still not 100% in love with it, but…I'm done.


I went with a white and mixed metal theme this year (the theme started with our Christmas mantel).


The garland is a DIY project using this tutorial.  


Our felt mistletoe is from West Elm.  A couple years ago I attempted to make my own but when the result was less than exciting, I ordered the West Elm version.


One day, in all of my spare time, I'll learn how to take bokeh shots.  And I'll fill up the tree with DIY ornaments.  And I'll make my own tree skirt.  And I'll solve all of the world's problems with a wave of my hand.  You might not want to hold your breath.

Monday, December 9, 2013

Winter Wood Slice Wreath

As I revealed in this post, I decided to tackle a wood slice wreath for our back door this season.  After an unexpected complication, here is the final product.


I pretty much followed this tutorial.  Our local craft stores did not carry wooden wreath forms so Seth made one for me.  


And that's how you get things done without a jigsaw.  Seth also used our miter saw to slice up a log into 1/4" pieces.  

TIP:  Learn from my mistake - let your wood slices fully dry out before assembling your wreath.  (See below for the scoop on what happens if you don't.)


Since the back of the wreath was going to be visible from inside our kitchen, I decided to cover our less than perfect wreath form.  I used spray adhesive and some felt-like material that I had laying around.


I tied on a piece of white muslin so that I could loop ribbon through it for hanging the wreath later on.  This way, I can change it up in the future.


I then used my hot glue gun to attach my wood slices in two overlapping layers.  


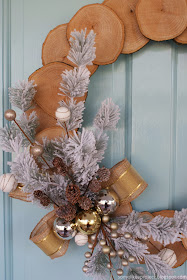
I then used ribbon and sprigs of faux greenery for my base layer.


I added a pinecone pick, a few ornaments, and a pick with white and gold decorative balls that I found at Lowe's.


I tied on a piece of gold ribbon for hanging and voila.


And here are some detail shots for you… (notice my reflection in the ornaments?)


As for the complication…after a couple of days the wood slices began to fully dry out.  As they dried out, they started to curve and a few popped off the wreath.


I found some small pieces of wood in my craft cart to fill the gaps and was able to reattach the curved pieces.


When you look at the wreath from the front, it's not as noticeable how angled that one wood slice piece is.  

I also took a few pics of her on the front door for fun.


The wood slices are just so organic and beautiful.  I love decorating with natural (and free!) materials.  

Is anyone else getting crafty with their Christmas decor?  I've fallen a bit behind but I'm hoping to finish our tree and front porch by the end of the week.  I can't believe Christmas is only a little over 2 weeks away!

Tuesday, December 3, 2013

Christmas Inspiration: The Tree

I'm back with another Christmas Inspiration post.  You can find the first two here and here.

Possibly the most important part of Christmas decor is the Christmas tree.  I love how everyone starts with the same "base" but ends up with vastly different end products.  I tend to stick to more traditional tree decor and shy away from themed trees.  Here are some trees that I can't stop staring at this year.


Kristin from The Hunted Interior used different metallic ornaments and disco balls to make her tree shine.


I'm also loving John and Sherry's paint chip tree from last year.  Such a great idea for homes with toddlers and/or destructive animals - nothing breakable!  Also, I have a TON of paint chips.


I'm loving the "Merry Christmas" garland and the monochromatic color scheme on this tree.  And could that owl be any cuter?


Isn't Emily's nature inspired tree with real, live succulents unique?  I would never have thought to add live plants to my Christmas tree.


The garland on Melissa's tree is amazing.  I have a thing for pom pom garland.  And again, I like the neutral color scheme.

Our tree is up and partially decorated, but I need more ornaments.  I'm trying to figure out how I can DIY some.  We also need a new tree topper.  It should be ready in a couple of weeks.  

In the meantime, I have finished (and fixed) the wreath for our back door so stay tuned for that post.  Hope everyone has an amazing week!