Showing posts with label entryway. Show all posts

Monday, May 20, 2013

A Modern, Inexpensive DIY Frame for Canvas Art

I decided I wanted to class up the canvas artwork in our entry by framing it.  We currently only have two canvas art pieces 'cause those suckers are expensive.  We will have to build our art collection over time.


My goal was a simple, cheap, easy DIY frame with a clean, modern feel.  I picked up some wood in the trim section at Lowe's, cut it to size, stained it, and glued it to the canvas.


I'm definitely pleased with the final result.  It adds just enough definition around the artwork to make it visually pop off the wall a bit.  And making the frame was super easy (minus a few necessary tweaks along the way that I'll share below so you can learn from my mistakes).

Supplies:
  • Wood (I used two 8 foot pieces of 1/4 in x 1 3/4 in x 8 ft pine lattice moulding that I found in the trim section at my local home improvement store for $3.14 each.  My canvas was only 1 1/2 in deep but I just left the extra 1/4 in and let it hang off the back of the canvas.)
  • Saw (We used a circular saw, but a hand saw would work just fine for these short cuts.)
  • Sand paper (I used a fine grit.)
  • Stain of your choice (I used Minwax stain in Dark Walnut.)
  • Adhesive (I ended up using gorilla glue - see below.)
  • Clamps

Simple How To:
  1. Measure your canvas and cut your wood to size (You could miter the corners but that is too complicated for my taste.  I just cut the pieces for the top and bottom to the exact size of the canvas and then for the sides I cut the pieces long enough to overlap the ends of the top and bottom pieces.  Make sense?  I just added twice the thickness of the moulding onto the measurement for the side pieces to get my final measurement.)
  2. Lightly sand the cut ends and any rough spots on the lattice
  3. Apply your stain, let it sit until the desired color is achieved, wipe off, and let dry
  4. Glue the pieces around your frame and clamp in place while drying (I tried to use liquid nails at first, but it wasn't adhering so I switched to Gorilla Glue.  If you've never used Gorilla Glue before you should know that it expands a lot as it is drying.  Despite applying what I thought was a small amount, the glue expanded out onto the front of my canvas and I ended up having to use my x-acto knife to carefully chisel away the excess glue.)
  5. Hang it back up and enjoy your handiwork!

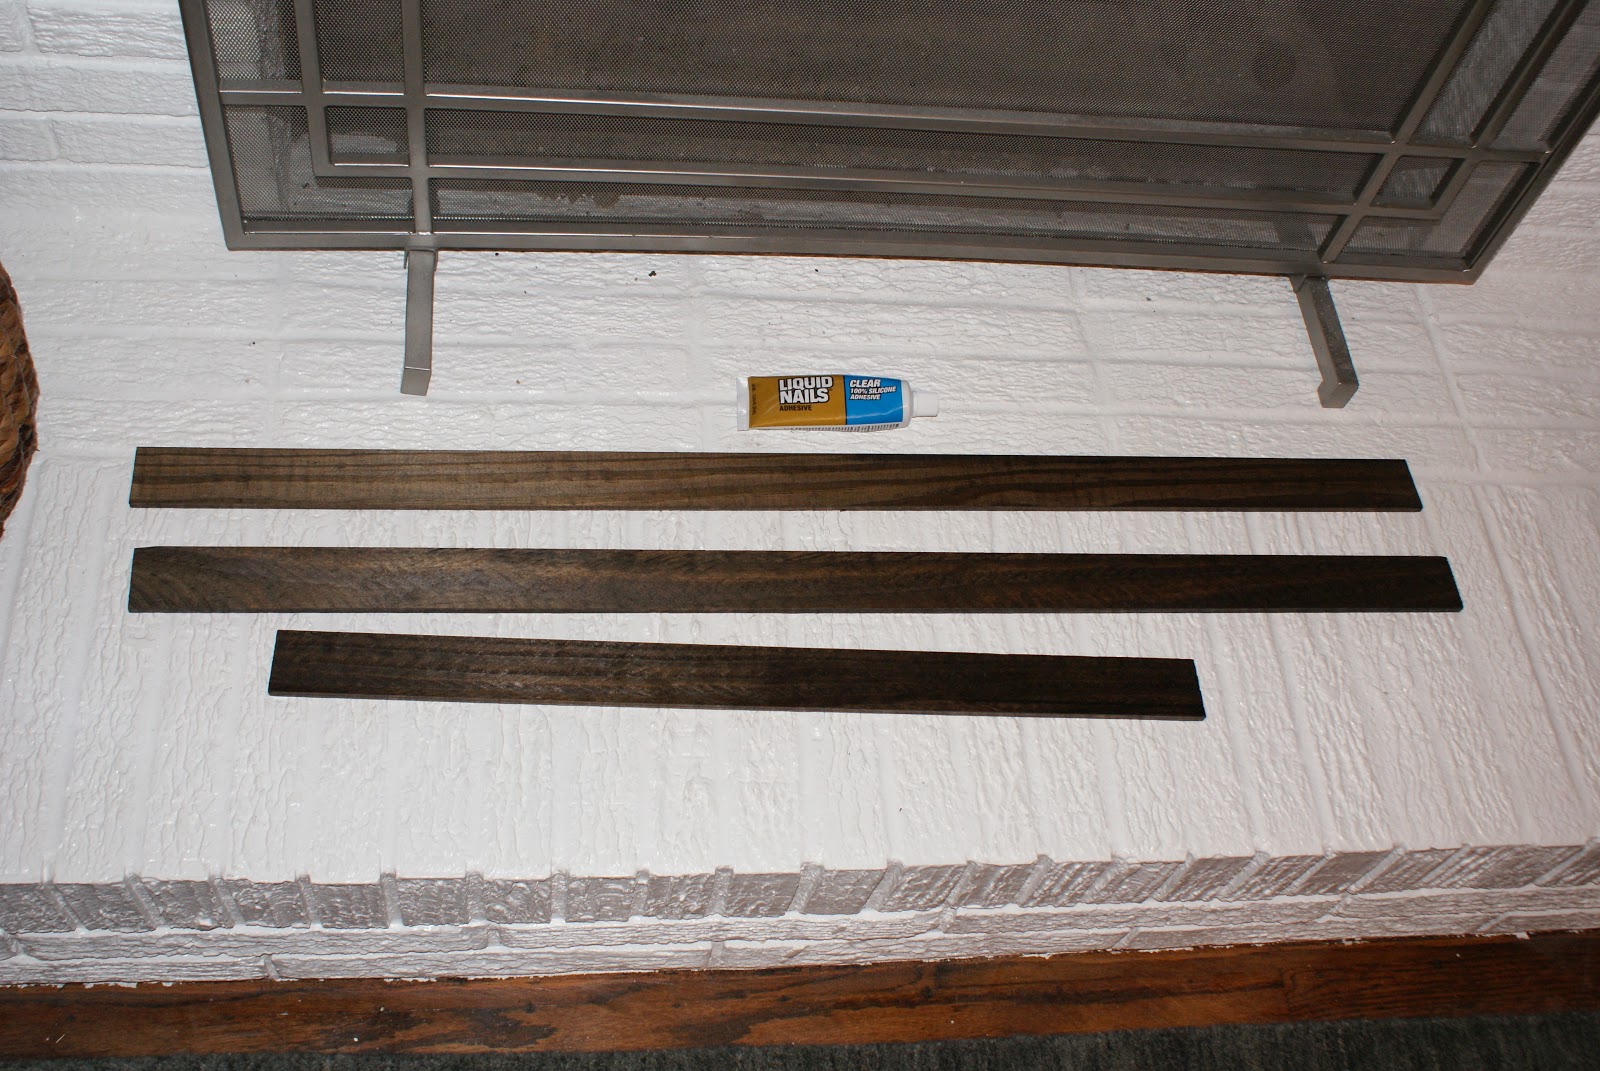
 Three of the four pieces stained and ready to go (or so I thought)


**Lesson Learned from Mistake #1: Stain both sides of your wood.  It is unlikely that your canvas will be perfectly square, and because of this, the bottom of some parts of the wood will show.  I had to remove my first board and take them all back outside to stain the backs.


**Lesson Learned from Mistake #2: Either don't use Gorilla Glue, use much less Gorilla Glue, or stand there and wipe it away as it seeps onto the front of your canvas. 

After carefully cutting and peeling it off, it was somewhat less noticeable.


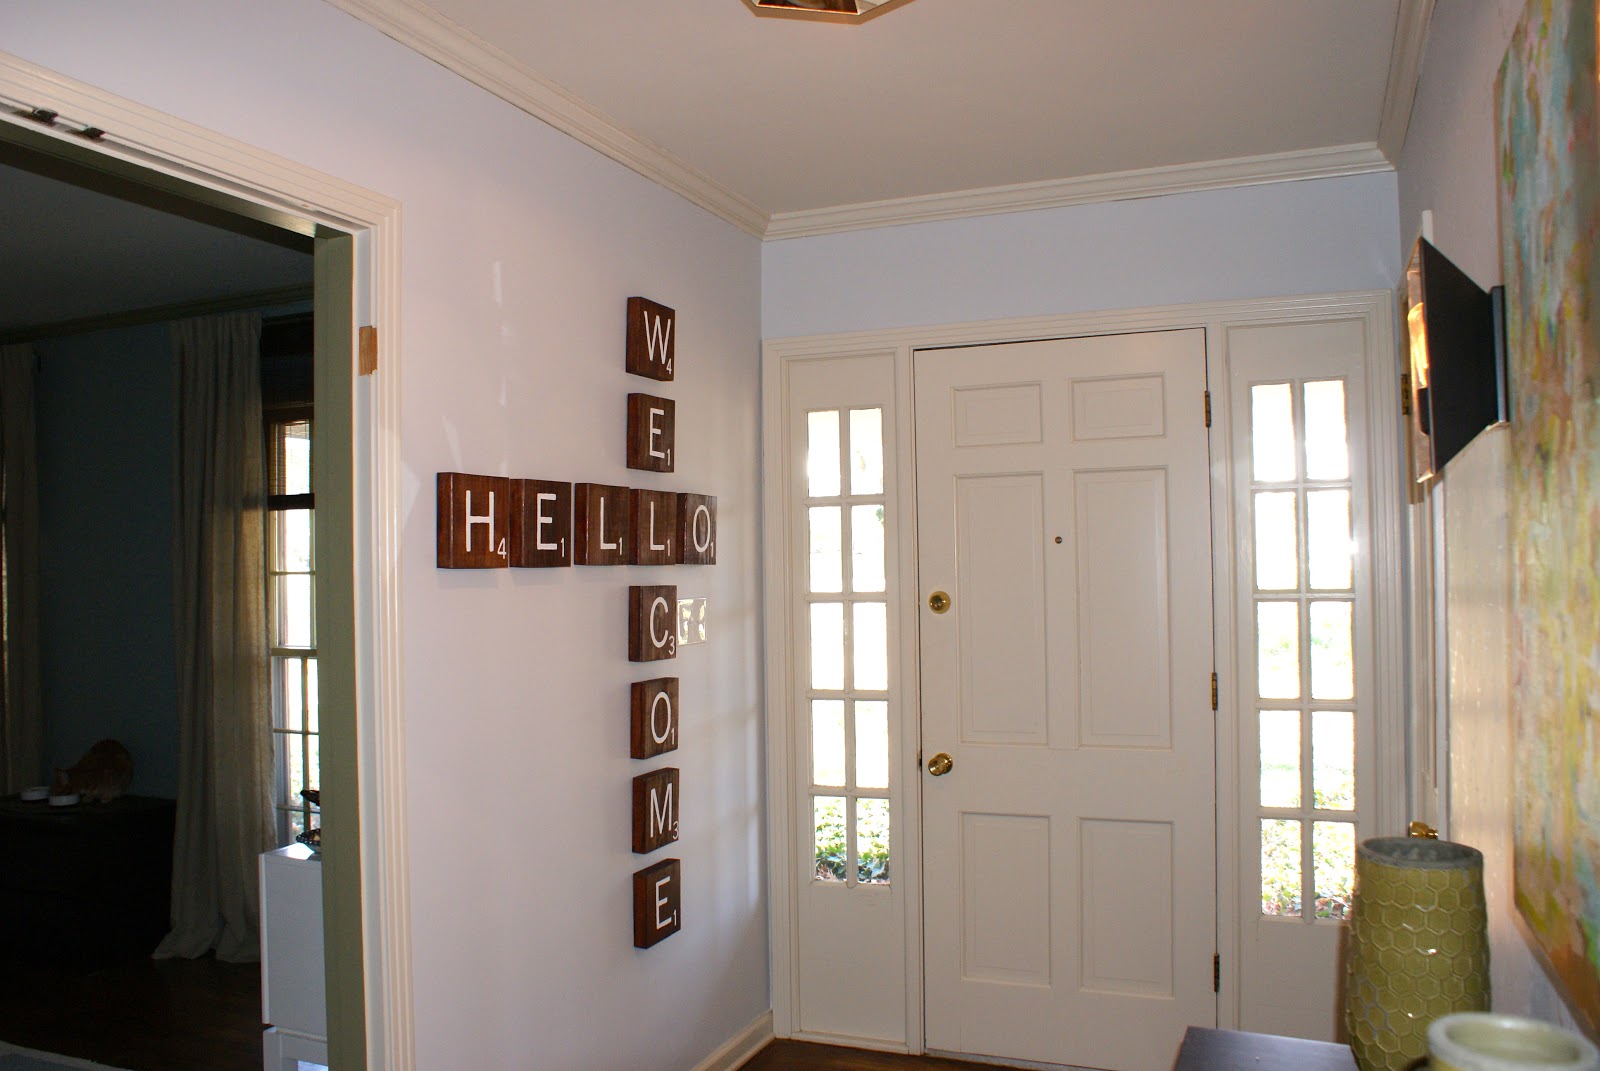
Since the new frame is 1/4" deeper than the canvas, we had to pull the nails out of the wall a bit further so that the wooden part of the canvas was hanging on the nails instead of the new frame.  I guess this would also be a way to fake a deeper, more substantial-looking canvas if you had a thin one.


The stain on the entry console is more cherry than walnut, but I think they look alright together.  I prefer the walnut color, so I really didn't want to stain the frame to match the console.  Who knows how long the console will be with us, if I'll paint it one day, etc.  Speaking of the console, did you notice that we added one of the octagonal milk glass knobs to the front drawer?  I love the contrast and how it ties into the white on the bottom of our dipped storage baskets.


Obviously, the lighting in the first photo was much better - sorry.  We are experiencing an overcast day today.  Don't let that fool you - focus on the frame.  :)  The total cost for this project was around $15 because I bought a quart of the dark walnut stain.  If you already owned stain and just needed the wood, the total cost would be closer to $6.  I will definitely be using this quick and easy framing technique again in the future.

Thursday, March 28, 2013

Scrabble Tile Wall Art

I guess I've been in the mood to fill up our blank walls lately, because it seems I've been blogging about DIY art A LOT.  Hopefully, you guys are enjoying these inexpensive art projects and aren't getting too bored with all the art posts.  I promise that I have other projects coming soon.  I have a couple of pieces of furniture that need some sprucing up, but the temperatures here have been too cold to motivate me to work in the carport.  I'm going to need at least 60 degrees for that.  Where is Spring???  Seth and I have also finally (I believe) nailed down the living room layout.  My mom was here for a visit and we brainstormed about all the possible options for television and furniture placement.  Now, we are working on purchasing a few new pieces and DIYing some others.  Should be some exciting stuff.  I'll share as we check things off the list.

For today, I'm going to show you an art project for our entryway that I recently completed.  


I enjoy playing Scrabble and Words with Friends and I was inspired by Scrabble tile art that I've come across on Pinterest and other blogs.  Check out Jen and Tim's space (below) that was featured on Apartment Therapy.


I like it a lot but it bugs me that the letters don't spell anything.  Does that bother anyone else?  Apparently, I'm not as much of a whimsical, free-spirit when it comes to things like this.  


Here is another inspiration photo with tutorial.  I love that the wood grain is enhanced due to the way she cut her tiles.  

Supplies you'll need:
  • wood (I used two 1x8x12s)
  • a saw
  • wood stain
  • a computer with a printer or a silhouette machine (I had to do this the old fashioned way)
  • acrylic paint & small brush

Seth cut my boards into 11 tiles for me.  They are roughly 7.75" square.  Then he gave them a quick once over with the sander.  I wiped them down and then stained them with Rustoleum Paprika wood stain.  Then I decided that they were too dark and too orange.  So I contemplated my options:  1)  Sand them all down and start over, 2) Stain them darker to match our other dark wood pieces and paint the letters white instead of black (kind of the reverse or "negative" of a regular scrabble tile).  I decided to go with option 2 because it would be less work and I thought that the dark stain would create more contrast with the light gray wall.  So they aren't super traditional looking scrabble tiles, but definitely still recognizable.  And now they have a unique twist.


I knew that I wanted my scrabble art to hang just inside our front door so I decided to use the words "welcome" and "hello" for mine.  I found the closest font I could for the letters (News Gothic MT) and the closest for the numbers (Arial Narrow) and tweaked them in Word until the letter/number set looked like a scrabble tile (I had to play with how far apart they were, etc).  I printed them off and then used a simple pencil transfer method (like I did for my lobster art in the hallway) to get a faint outline on my stained tiles. I then filled in the outline with a steady hand, patience, a small brush, and white acrylic paint.


The letters aren't perfect, but I think that adds to the homemade feel of it.  We bought some sawtooth picture hangers (like this) and attached them to the back of each tile for hanging.  I love the new Command picture hanging strips, but these pieces of wood were heavy and I was too chicken to use them for this project.  


And in a few weeks, our trim should be all white!  I cannot wait.


I'm excited that another blank wall is now sporting some DIY art.  Yeah, I said sporting. Onto the next project.

Friday, October 5, 2012

The Neverending Stencil Story

Don't worry.  This blog post will not be neverending.  It was the stenciling itself that was neverending.  Actually, it has ended - finally.  But it felt like it was never going to end. Extra points if this image flashed through your mind when you read the title.


I actually wasn't a huge fan of the movie, but many of my friends and classmates loved it. I was kind of creeped out by it.  Anyhow...back to stenciling.  I have been in love with the idea of using wallpaper or a stencil somewhere in our house for awhile.  


I just love how stencils and wallpaper can transform a room.  So what room would I transform?  I narrowed it down to the guest bathroom or the entryway before settling on one focal wall in the entryway.  And would I use wallpaper or a stencil?  Definitely a stencil since it would be less expensive than wallpaper and easier than hanging wallpaper. I browsed around on the Royal Designs website and the following stencils caught my eye.  


I ran the options by Seth and we ended up ordering the stencil in the fourth pic - the Small Moorish Trellis Stencil.  And thanks to John and Sherry over at Young House Love we got 10% off (they have discount codes on their blog for great stores!).  

Next decision - what color of paint to use for the stencil.  I did want the wall to be the focal point of our entry, but I didn't want it to get too busy.  The wall currently has two mirrored wall sconces.  It will have a console table (which I have plans to paint a fun color), storage baskets, and some sort of art piece.  Since it will be pretty "filled" visually with furniture and accessories, I made the decision to try a stencil in the high gloss version of the wall color.  Here is the before picture.  


Sorry about that shadow at the bottom.  Not sure if that's my finger or what.  I am not a professional photographer.  Maybe I'll get better as I continue blogging.  Let's hope so for your sake.  


I started by measuring the wall to find the midpoint between the two sconces (aren't they pretty?) so that I could center the design there.  Then I carefully taped my stencil up on the wall.  I bought some spray adhesive that you are supposed to be able to spray on the back of the stencil and then reposition as needed, but I was afraid that it would leave a sticky residue.  I ended up using some blue painters tape instead, which I did have to change out every so often as it lost its stickiness, but other than that, it worked just fine.  Here is an embarrassing backside action shot for you.


I used a foam roller to roll the paint in the gloss finish over the eggshell finish on the wall.


Above, I am trying to line up the stencil perfectly which was kind of difficult since I used such a low contrast scheme.  I later found out that the stencil has little triangular cutouts that you are supposed to use for lining it up and repositioning, but I'm not sure it would have helped me that much.  You have to be very careful about keeping it level and lined up though.  Trust me - if you ever come and visit, we can play a game of Spot My Stenciling Mistake.  It's kind of like Where's Waldo.  And in case you were wondering, my hair looks a bit odd and poofed up in this photo because I'm wearing a headband.  

After a long, grueling process we ended up with this.


It's pretty much what I had envisioned.  It's subtle, but definitely there (even more so in person than in these pics).  A part of me wishes that I had chosen a different paint color for the stencil to give it a little more contrast so that all my hard work was a bit more noticeable, but I think that's because the wall is currently empty.  Once I get around to painting our console table and adding art and accessories, I bet I'll be fine with it being so subtle.  It's been nice to watch how the sunlight coming into the house at different times of the day affects how visible it is.  I highly encourage anybody out there considering a stencil in their house to dive right in!