We're popping back into the master bedroom today so that I can show your our new artwork. You may remember that way back in April, I shared a mood board detailing the new direction for our bedroom. It included four prints that I planned to hang above our nightstands. Well, four months later, they are finally gracing our walls.
For my side, I chose an out of focus photography print from Minted. It's called autumn obscured.
I love its abstract feel. And the colors are perfect. I ordered it with the modern white frame.
The other print is a cute ampersand from Jones Design Company. I popped it into a square silver frame from Target that I had on hand.
I also added a mother in law tongue that I picked up at Wal-Mart and planted in a mercury glass vase. My glasses sit in a small wooden tray that I found at Marshall's and I purchased my iPhone dock from CB2.
The small floral frame contains a picture of me and my grandmother that I inherited after she passed away and I haven't changed the frame since she chose it to put our picture in.
Over to Seth's moodier, more masculine side.
He approved the antelope squirrel print (which we lovingly refer to as the squirrel-a-lope)...
and Clare Elsaesser's November print for his side. The white frame is from Wal-Mart and the other one is another square silver frame from Target.
I forced him to get a new alarm clock. (I just searched to find you a picture of his old one but I apparently edited it out of my photos. For good reason. It was similar to this.)
I also built him the wooden storage caddy for his kindle and iPad to sit in. His nightstand is definitely looking more streamlined now. But he is pining for his old alarm clock.
It's nice to finally have some art hung to liven up the white walls.
And the addition of a live plant makes me happy every time.
I decided I wanted to class up the canvas artwork in our entry by framing it. We currently only have two canvas art pieces 'cause those suckers are expensive. We will have to build our art collection over time.
My goal was a simple, cheap, easy DIY frame with a clean, modern feel. I picked up some wood in the trim section at Lowe's, cut it to size, stained it, and glued it to the canvas.
I'm definitely pleased with the final result. It adds just enough definition around the artwork to make it visually pop off the wall a bit. And making the frame was super easy (minus a few necessary tweaks along the way that I'll share below so you can learn from my mistakes).
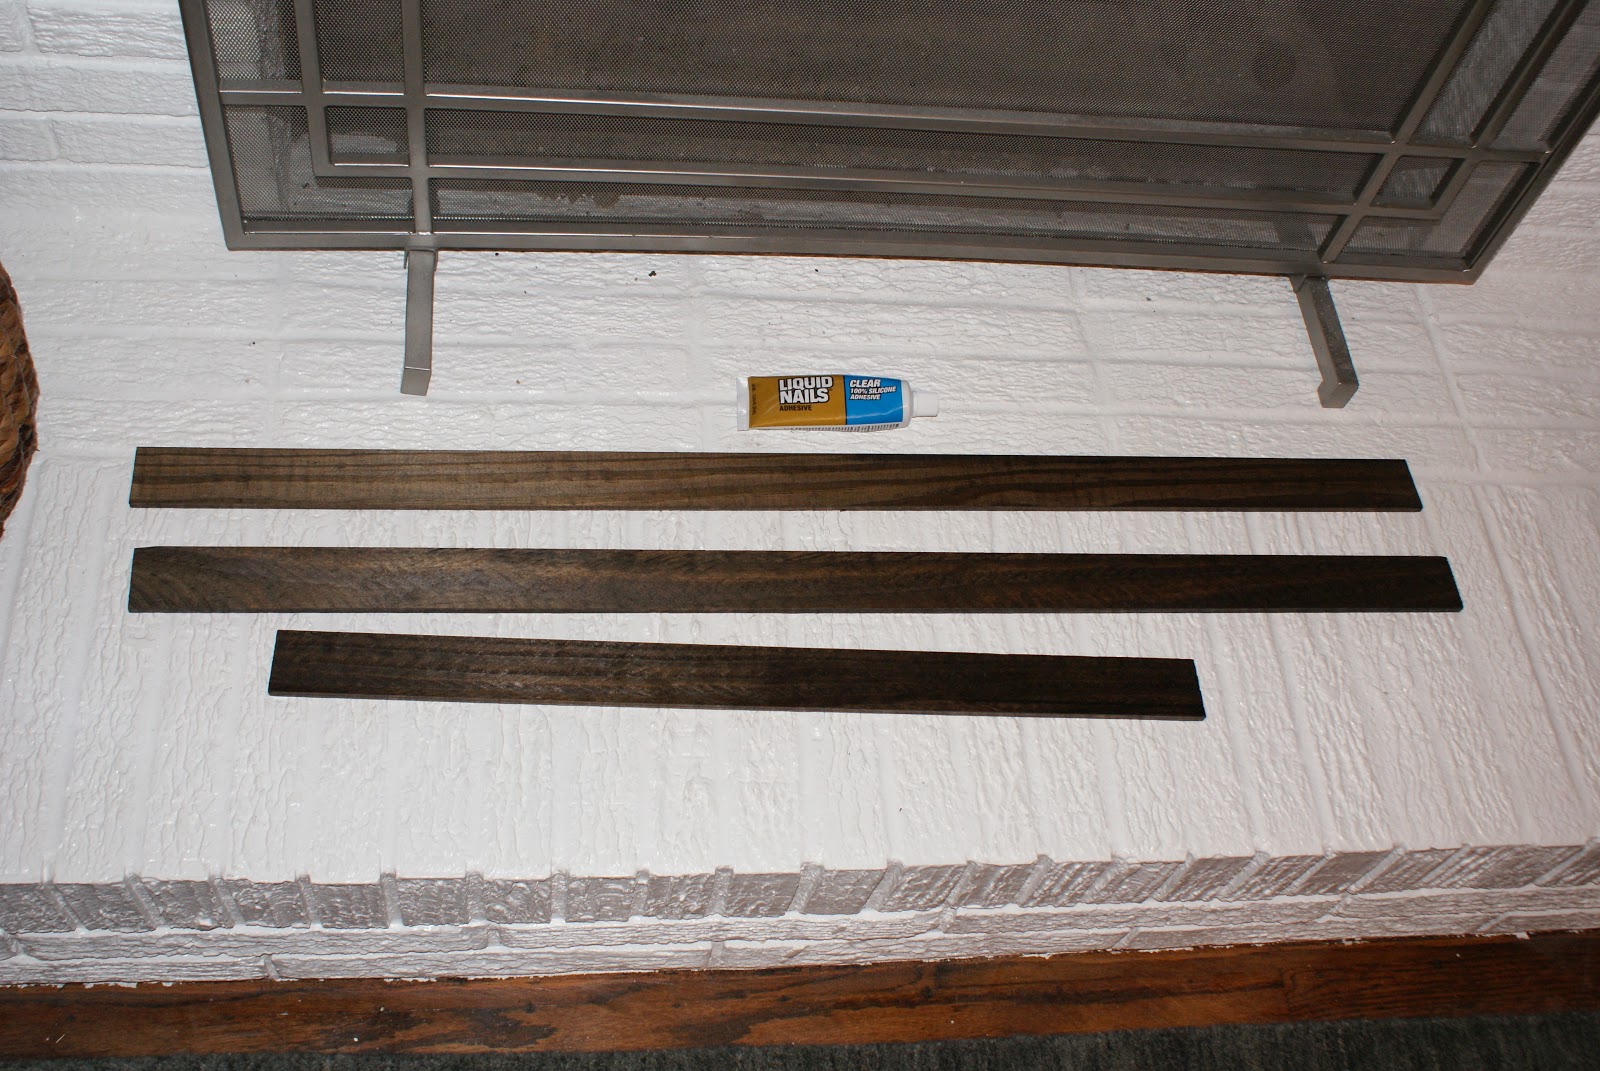
Supplies:
Wood (I used two 8 foot pieces of 1/4 in x 1 3/4 in x 8 ft pine lattice moulding that I found in the trim section at my local home improvement store for $3.14 each. My canvas was only 1 1/2 in deep but I just left the extra 1/4 in and let it hang off the back of the canvas.)
Saw (We used a circular saw, but a hand saw would work just fine for these short cuts.)
Sand paper (I used a fine grit.)
Stain of your choice (I used Minwax stain in Dark Walnut.)
Adhesive (I ended up using gorilla glue - see below.)
Clamps
Simple How To:
Measure your canvas and cut your wood to size (You could miter the corners but that is too complicated for my taste. I just cut the pieces for the top and bottom to the exact size of the canvas and then for the sides I cut the pieces long enough to overlap the ends of the top and bottom pieces. Make sense? I just added twice the thickness of the moulding onto the measurement for the side pieces to get my final measurement.)
Lightly sand the cut ends and any rough spots on the lattice
Apply your stain, let it sit until the desired color is achieved, wipe off, and let dry
Glue the pieces around your frame and clamp in place while drying (I tried to use liquid nails at first, but it wasn't adhering so I switched to Gorilla Glue. If you've never used Gorilla Glue before you should know that it expands a lot as it is drying. Despite applying what I thought was a small amount, the glue expanded out onto the front of my canvas and I ended up having to use my x-acto knife to carefully chisel away the excess glue.)
Hang it back up and enjoy your handiwork!
Three of the four pieces stained and ready to go (or so I thought)
**Lesson Learned from Mistake #1: Stain both sides of your wood. It is unlikely that your canvas will be perfectly square, and because of this, the bottom of some parts of the wood will show. I had to remove my first board and take them all back outside to stain the backs.
**Lesson Learned from Mistake #2: Either don't use Gorilla Glue, use much less Gorilla Glue, or stand there and wipe it away as it seeps onto the front of your canvas.
After carefully cutting and peeling it off, it was somewhat less noticeable.
Since the new frame is 1/4" deeper than the canvas, we had to pull the nails out of the wall a bit further so that the wooden part of the canvas was hanging on the nails instead of the new frame. I guess this would also be a way to fake a deeper, more substantial-looking canvas if you had a thin one.
The stain on the entry console is more cherry than walnut, but I think they look alright together. I prefer the walnut color, so I really didn't want to stain the frame to match the console. Who knows how long the console will be with us, if I'll paint it one day, etc. Speaking of the console, did you notice that we added one of the octagonal milk glass knobs to the front drawer? I love the contrast and how it ties into the white on the bottom of our dipped storage baskets.
Obviously, the lighting in the first photo was much better - sorry. We are experiencing an overcast day today. Don't let that fool you - focus on the frame. :) The total cost for this project was around $15 because I bought a quart of the dark walnut stain. If you already owned stain and just needed the wood, the total cost would be closer to $6. I will definitely be using this quick and easy framing technique again in the future.
As promised, I will take you through our new hallway gallery wall piece by piece. Some of the art is purchased or printed and some was made by yours truly.
2. This art was a free printable from Sarah Dorsey's blog.
3. I made this by printing a silhouette of the state of Illinois, cutting it out, tracing it onto some scrapbook paper, cutting that out, and attaching it to some white card stock. The key is from our first house and I glued it to the spot on the map where Quincy (the city we lived in) is located. I painted the white mat a dark gray with some acrylic paint that I had on hand.
4. This string art was inspired by project #118 in John and Sherry's book. I first traced the Auburn logo onto some navy blue card stock. Then, I used a push pin to make holes along all four sides spaced every 1/4".
I used a ruler to visually join the corresponding holes (ie the ruler was lying diagonally across the paper connecting the 1st hole on the left side with the 1st hole on the bottom, then the 2nd hole on the left side with the 2nd hole on the bottom, etc). This allowed me to make holes in the appropriate spots surrounding the logo. Did that make any sense? I then used two colors of embroidery thread and started stringing them through the holes. I started with one color, skipped every other line and then went back with the second color.
Here is a picture of the back of it. (This was before I figured out that there was a better way to string it so as not to waste so much embroidery thread.) I numbered some of the holes so that I would know when to thread them. It was definitely a time consuming project.
5 & 6. Google helped me find the sousaphone and clarinet silhouettes, and then I just printed them onto some burlap. Seth and I were both band geeks in high school and proud of it. One of us played the clarinet and one of us played the sousaphone. I'll give you one guess as to who played which instrument. To print on burlap, I used the technique described here. There are a ton of tutorials on how to do this and most of them include ironing your piece of burlap onto freezer paper before printing. The tutorial I used did not use freezer paper. I didn't have any and I like to keep things simple around here.
That being said, you need to make quite certain that your burlap is secured all over the printer paper. If it is not, the burlap will shift during printing and the image will print crooked. I guess that is where ironing it down onto some freezer paper would come in handy.
See what I mean? Third time's the charm I guess.
7. This is a print that Seth has had for years. We just placed it in a nice crisp white frame with a mat. I love the white barn and how colorful it is.
8. I painted this quote onto a canvas using a simple transfer technique. After I printed off my words, I flipped them over and traced their outline with pencil making sure to create a heavy line.
I then flipped them back over (front side up now), placed them where I wanted them on the canvas, and traced their outline again. This left me with a very light pencil outline on the canvas that I could follow as I was painting. (You don't want me to free hand anything. Ever. I promise.)
For the lobster, I just cut out his silhouette, traced him onto the canvas, and filled him in with paint. If you don't know where the quote is from, you haven't watched enough of the greatest sitcom ever produced...Friends. The clips below explain it. Just make sure to cut it off before the horrible credit music comes on at the end (it was added by the person that put this video together).
Moving on to the other half of the wall.
9. My inspiration for the map art was this piece that I found on Etsy via Pinterest. My mom picked up a few state maps at the Tennessee welcome center one time on their way home from visiting us in Illinois. I think they were for a class project (she teaches elementary school). Serendipitously, she had one left over. For this project, I decided to use a pig silhouette versus hearts like in the inspiration piece (Seth is a swine vet for those that don't know so pigs are a major part of our lives). Again, I just used google to find a pig silhouette that I liked, printed it off, and traced it on the map around the cities that I was cutting out.
I cut out around the city where we met, the city we got married in, and the city where we currently live (Knoxville, Maryville, and Jackson respectively for those of you who are curious). Then I attached the little piggy maps to some navy blue card stock and added the words "hello.", "i do.", and "home." underneath them.
I've also seen people use the words "we met", "we married", and "we live". You could also use the cities where you and your spouse were born and then the city where you met or where you got hitched. The possibilities are endless.
10. I quickly threw this together in Word. I was going for an ombre effect and used a verse from the Bible (Psalm 46:10a) that helps me remember to slow down when I get caught up in life. It may get tweaked at some point. It's a bit difficult to see the "be" part of the phrase.
11. At the start of this gallery wall I knew that I wanted a deep canvas that I could put on hinges to cover our thermostat. This one was perfect. I painted some circles in various colors on it and called it a day. For now. I was inspired by this amazing piece by Jesse at Cape 27. Mine did not turn out as nice as hers. I think the orange is throwing mine off. It will definitely be tweaked or completely redone in the future.
I've seen some people on Pinterest commenting that a canvas covering your thermostat will affect its temperature reading. So far, we haven't noticed any problems.
12. My version of DIY paint chip art. Again, something that may get replaced in the future.
13. For those of you that don't know your Central American countries, this is Costa Rica. (I wouldn't have known either and I've been there...whoops.) The heart marks the spot where Seth and I honeymooned. It's Arenal. I highly recommend a trip there. I have been wanting to go back ever since we left.
14. This is another plate that I purchased from Anthropologie.
So there you have it. Our new hallway gallery wall. I hope it inspires you to take on an art project or two. Even if they don't turn out how you had first envisioned (like many of mine), making some of your own art will save you quite a bit of money (and you can always upgrade as your pocketbook allows). I'm still saving up for my first Michelle Armas purchase. One day, I hope. One day.
Have any of you tackled DIY art? Did it turn out exactly as you had hoped? I'd love for you to post some pictures in the comment section!


