Showing posts with label gardening. Show all posts

Wednesday, May 6, 2015

Simple Summer Garden

Since we have twins on the way, we decided to keep it simple in the garden this year.  First, Seth weeded the beds and then he mixed in some garden soil with fertilizer.  We opted to stick mostly with what some might call a salsa garden (or maybe an Italian-themed garden).

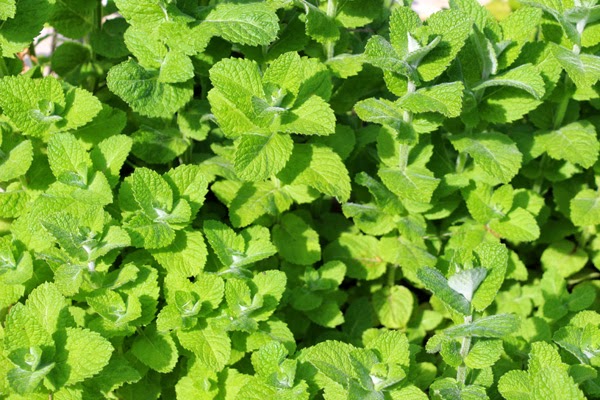
One exception to that theme is our mint.  It came back with a vengeance in our front herb bed.


We literally did nothing and look at it!  I'm glad we have it in a raised bed because I'm pretty sure it would have taken over the entire yard.


I'm looking forward to some mint iced tea and mojitos.

In the other herb bed, we decided to stick with cilantro.  We will have to do a better job of harvesting it consistently to keep it from going to seed like last year.


It always looks really sad when you first plant it.  Don't worry - it has since perked back up.

This year the left bed is our "pepper bed".


In the back, we planted two bell peppers, a chili pepper, and some extremely hot pepper (I forgot the name) that Seth wanted to try.  The plant in the left foreground in the photo above is an eggplant and we also stuck our basil in this bed (across from the eggplant above).


On the right side, we were surprised to see multiple onions coming up this Spring.  Again, we did nothing for them.  They must be onions that didn't germinate last year for whatever reason.  I didn't realize they could survive freezing temperatures but they look great so far.


In front of the onions, we planted four tomato plants.


We chose two cherry tomatoes, one large red slicing tomato, and a purple heirloom tomato.

We set up the soaker hose system like last year and are hopeful that we will have better success.  I'll let you know what the results are.  

Tuesday, June 3, 2014

Wooden Tomato Cages

Our tomato plants are getting big.  There are tiny tomatoes now visible on our sweet 100 plant. Yay!  I knew that we would eventually need some tomato cages, but when my friend Nancy pinned this on Pinterest, purchasing some of the typical metal ones was no longer an option.  I just had to build some of these beauties.


The tutorial is pretty straightforward so I'll just add some helpful hints as I take you through the process.


You will need two 2x2x8s and three 1x2x8s per cage.  (Pictured above is the wood we purchased for all four of our cages.)


We purchased our wood from Lowe's and it was bundled up with black ties.  Since we weren't aiming for absolute perfection we left the ties on and made our cuts through each bundle.  This made quick work of the measuring and cutting steps.  Of course, you must be sure to line up the ends of your boards first.


Then, we started assembling the sides by nailing the 18" pieces of 1x2 onto the 2x2s at 15" apart (see diagram in the original tutorial post).

Then we nailed the 19.5" 1x2 pieces in place to form our cage.  And then it fell apart.

Ok.  Not completely.  But it was terribly fragile.  And the pieces were trying to pull apart.  So we disassembled our first cage and started again with galvanized screws (leftover from our raised beds).  And the result was much improved.


I'm not sure if using a brad nailer (like Kristen did in the original tutorial) would produce a different result or if we still would have switched over to screws.  We wanted to make sure that these babies would last.  


We used a rubber mallet to pound them down into the ground about six inches.  Then we stepped back to admire our work.


Not bad for $30.  Only a bit more expensive than metal cages ($6 ea at our Lowe's) and so much more attractive.

Wednesday, May 28, 2014

PVC Pipe Garden Markers

I made some garden markers for our new raised beds out of metal BBQ skewers and PVC pipe.


I found these skewers in the dollar section at Target and snatched them up.  You need one skewer for each garden marker.


I also purchased some 1/2" diameter PVC pipe, cut it into 5" pieces with a hacksaw, and spray painted them with chalkboard paint.

I probably should have used a larger piece of cardboard to catch the overspray.  Whoops.

I used a chalkboard marker to write the names of our herbs and veggies onto the PVC pipe pieces after they dried, and then I slid them through the circular opening in the skewers.


The PVC pipe was slightly larger in diameter than the opening in the skewer so I used some pliers to pull the skewer open slightly before sliding the PVC pipe inside.

Do you see how much our veggies have grown?


I was a bit worried about the chalkboard marker getting rinsed off in the rain, but so far it hasn't been a problem.  Maybe the sun baked the labels on.


This was an easy, inexpensive project that adds a nice custom touch to our garden.


Saturday, May 17, 2014

Dirt & Veggies & Herbs, Oh my!

Where were we?  Oh, yes.  We built our DIY raised garden beds and attached some galvanized hardware cloth to the bottom to create a mole barrier.  After that, it was time for dirt.


It took almost two "scoopfuls" (two truckloads) of dirt from a local nursery.  The dirt is a special combination of topsoil, compost, and sand that they had available for gardening.


Seth shoveled it from the bed of the truck into the two raised beds (and later the herb beds) and I used a hoe to spread it around.  I believe it was close to 90 degrees that day and we were sweaty.  (Just painting a realistic picture for you.)

Next, we laid out our soaker hoses and used some landscape fabric pins to help hold it in place.

Hehe...Amos looks tiny next to the huge bed.

What I dislike most about gardening and adding new plants to our landscape is watering them. Not the act of watering itself, but the fact that I get eaten alive by mosquitoes while doing it.  They are horrible in our yard.  In short, our neighbors are breeding mosquitoes due to a grading issue in their backyard.  So in order to minimize the amount of time that mosquitoes are feasting on my flesh, we decided to utilize a soaker hose system in the garden.


It's definitely not the prettiest set up.  The closest spigot is located inside the carport near the back door so we had to run a hose through the carport and across the backyard.  We then attached a splitter, two short hoses (the shortest ones we could find at Lowe's), and the two soaker hoses.  

It may be ugly but it's definitely convenient.  And I have avoided West Nile virus thus far.

Alright...onto the fun part.  Planting some veggies!


We first laid out our plant choices to determine if we needed to rearrange the soaker hose, and then we started digging in the dirt.  Soon we had all of our plants in place.


The photo above shows our left bed.  It contains tomatoes and peppers.

red slicing tomato

red striped heirloom tomato

green striped heirloom tomato

sweet 100 cherry tomato

sweet banana pepper 

bell pepper (not sure if it's going to be red or green) 

cayenne pepper

poblano pepper

The right bed contains onions, yellow squash, zucchini, and okra.

red, white, and yellow onions

 yellow squash

zucchini squash

okra

As I mentioned in my previous post, we also decided to build a couple of smaller herb beds.  


They are 2 foot x 2 foot and constructed the exact same way as the larger veggie beds.  The front herb bed contains mint and basil.

mint

greek basil

thai basil

The back herb bed contains two cilantro plants.  Because we LOVE cilantro.  And because, for some reason, it tends to be out of stock at our grocery store almost every other week.

cilantro


I'm planning to "pretty it up" by defining the garden area and by adding some garden markers. Stay tuned.  Have a great weekend!