Showing posts with label nursery. Show all posts

Thursday, May 28, 2015

DIY Tree Mobile for Twin Nursery

Here's the quick rundown on how we made our tree mobile.  (Inspired by this.)


We used a gold macrame ring, fishing line, and balsa wood.

We found a simple tree template and used it to trace and cut out three different sized trees.


Seth used a tiny drill bit to drill a small hole in the top of each tree.


Then, Seth left 1/3 of them natural, stained 1/3 with a light coat of Minwax's Special Walnut stain, and stained the remaining 1/3 with a heavy coat of Minwax's Special Walnut stain.

Then, I simply used fishing line and tied the trees onto the macrame ring in a random design.  I varied their heights and the different colors as I went along.

We tied three lengths of fishing line at even intervals around the top of the ring, brought them together, tied a knot, and hung the mobile on a white screw hook.


Simple as that.  :)


Friday, April 24, 2015

DIY Tripod Floor Lamp

As promised, I'm back to show you how Seth built a tripod floor lamp for the nursery.  After browsing West Elm and Target and finding nothing that I liked for a reasonable price, I remembered this tutorial from Sarah Dorsey.

Although a bit more complex then the branch light, it looked feasible.  And for <$20 in materials (not including the lamp shade of your choice), I knew that we had to try it.  And Seth agreed!  :)


Sarah's instructions are quite thorough but I'll run through our process as well including a few snags we hit along the way.


Our supplies:

  • scrap piece of 2x4 (pic shows it after Seth cut and sanded it)
  • harp (bottom part shown, top part not pictured)
  • socket
  • threaded nipple
  • hex nut
  • metal conduit (we used two of these cut into three 4 foot sections)
  • cord with plug
  • spray paint (not pictured)
  • rubber leg tips (we used these)

Note: We already had some of the lamp parts on hand so it was cheaper for us to purchase these items individually, but you could also purchase a lamp kit.  We also opted to pick a socket with a pull down cord versus a switch in hopes that it would be easier for me to reach.

Now for the building and assembly...

First, you'll need to drill the holes in one of your conduit legs for the cord.  You want one hole on what will be the inside of your leg and another on the outside.  

Next, you need to fashion your piece of 2x4 into a center piece that will hold your three legs and your socket (see first pic above).  

Seth used the template from Sarah to mark the three hole locations.  


We ended up drilling these three holes at about a 10 degree angle.  Seth made a guide with some scrap wood and used one of our larger drill bits to pre-drill them.

Then he used an 11/16 paddle bit (this was the exact size of the outer dimension of our conduit) to widen the holes.


Next, he used a glass to trace a circle and cut it out with the jigsaw.


At this stage, we mistakenly followed Sarah's tutorial and attempted to make an indentation in the center for our socket to nestle down in.  Seth also drilled a hole in the center of the circle for the threaded nipple and cord to run through.  

He sanded the circle and it was looking great until he attempted to insert the conduit legs.  It was a tight fight since he had drilled the holes to the exact measurement of the conduit and so he gently tapped them in with a rubber mallet.  And then the wood split in two.  Sad day.  

However, he realized that since we were using a harp for ours, we didn't need the indentation for our socket to sit in (the bottom part of the harp would prevent the socket from being able to nestle down into the wood).  So, he went through the whole process again minus the indented area for the socket hoping this omission would make the wood stronger and less likely to crack.

Still, despite being super careful, the wood started to crack again during the leg insertion, but he did get the legs in without it completely splitting.  To fix the crack, he used wood glue and some hose clamps.  


He let that sit overnight, gave it a light sanding to get rid of excess wood glue, attached the rubber leg tips, and spray painted it gold.


After it dries, you will need to thread your wire through the holes in your leg, up through the threaded nipple, and wire your socket.  (If you're using a harp, don't forget to place the bottom piece over the threaded nipple before wiring and attaching your socket.)

Then, attach a shade of your choosing and you're done!  (I splurged a bit on this ikat drum shade from the Young House Love collection at Shades of Light.)


I think it turned out great.  It goes well with our other nursery decor.  We only have a few things left until the nursery is complete!

Thursday, April 23, 2015

DIY Overhead Nursery Light

There was no way that I was leaving the builder-grade boob light in the nursery.  In case you're not familiar with that terminology, here is the definition from Urban Dictionary.  And here are some examples.

After reading Jenny's tutorial for this DIY branch light many months ago (we were only still discussing the addition of a child at that point), I actually went out and purchased the supplies to make it with the intention for it to replace the chandelier in our closet that only has 2/3 working sockets.  But then I never built it.  

Turns out that was a good thing as it is perfect for the overhead light in the nursery.  

This is a really simple light project that anyone can do.  There is no wiring involved in making the actual light (just in installing it in the room as with any overhead light).

Supplies:
  • ceiling medallion (optional)
  • socket splitters (I think I used 14)
  • light bulbs (I chose clear, round 25 W bulbs and needed 15)
  • porcelain ceiling socket
  • spray paint

To assemble, simply screw your first socket splitter into the ceiling socket and then continue adding splitters and shaping it into a design that you like.  I played around a bit and came up with this.


You could also do a longer, "drippier" design like this if you have tall ceilings.

Then, I stuffed cotton balls into the sockets to protect the electrical elements and Seth sprayed it and the ceiling medallion gold.


After that, it was just a matter of installing it and adding the bulbs.


With fifteen, 25 W bulbs this baby gives off quite a bit of light.  Thankfully, when Seth replaced the cream colored switches, he installed a dimmer switch for this room.


The "branching" aspect of it ties into the subtle woodsy/nature vibe that we have going on (which you'll see soon enough).  


Next up, I'll show you the tripod floor lamp that Seth made.

Friday, April 17, 2015

Transforming a Lane Acclaim Side Table

Most mid-century enthusiasts are very familiar with Lane Furniture.  The company was started in Virginia in 1912.  They are famous for their quality craftsmanship and you can spot their pieces by the presence of dovetail joints, tapered legs, metal details, and rounded corners.  While my mother and I were shopping the Longest Yard Sale this past summer, I came across a Lane Acclaim side table.  It had seen better days for sure, but I couldn't pass it up.


I snatched her up for $20.


According to the serial number, it was manufactured on September 10, 1966 (I found out that you read it backwards).  The extra number (2 in this case) represents that plant where it was made.

After wiping it down with a wet washcloth and letting her air dry, I started the long laborious sanding process.  I had to sand quite a bit to get most of the discolorations out and was never able to entirely eliminate the pink stain (nail polish???).


I went overboard with the sanding trying to get the pink stain off and ended up gouging the wood.  :(  Sad day.  

It makes things more difficult when the grain is running in different directions around the dovetails.  Oh well.  The good news was that I was refinishing this piece for the nursery and have no plans of selling it.

Next, I applied Minwax's Special Walnut stain (while wearing a mask to help protect the babies from fumes) followed by two coats of Acrylacq.


Another great option would have been to use some Restor-a-Finish in walnut instead of stain.


It appeared that the original tips of the tapered legs were painted black (?).  If I was going for the most authentic look, I should have repainted them black.  However, I decided to do something a little different and spray paint them gold (revealed below).

And here is the finished product in its new home.


I'm pleased with how it turned out.  It's not perfect, but it has some character.


And I like the gold tipped legs.  Even if they aren't authentic.

Next week, I'll show you the overhead light and floor lamp that Seth and I made for the nursery as well as a sneak peek of the accent wall!

Monday, April 6, 2015

Nursery Art Decisions

Things have pretty much fallen into place for the nursery design (only a few, minor changes since my last post)...except the main art piece.  I just can't decide.  I thought I'd share the prints that I'm currently waffling over (all are pictured on the left side above the dresser).

First is "The Meadow" by Melanie Severin.


I like the calm, fluid feel and the touches of pink.  It might be nice for our baby girl to have at least a little pink in her shared nursery.  It incorporates the aqua and some green.  Possibly not the exact shades of green in the pillows, but I think it would look okay.

Another option is "Photo-synthesis No. 6" by Satsuki Shibuya.


It has a lot more green in it and more of a masculine feel to me.  There is a touch of aqua.  I'm not sold on it for some reason.

The third print is "Salvation Mountain" by Britt Bass Turner.


It has a more child-like feel to me.  It's colorful and maybe a bit busy and Seth isn't too sure about it (maybe better for the playroom?). I don't know what it is, but something keeps drawing me back to this one.

Lastly, is another Britt Bass Turner piece entitled "Swoop".

My main concern is the mint green color (upper right quadrant).  Possibly not the best addition with the other greens we have going on in the room.

I would really like to make a decision this week and get the darn thing ordered.  Then I can finalize some other details.

Which print would you choose?  I think I've narrowed it down to option #1 or option #3.  I'd love to hear your opinions!

Saturday, April 4, 2015

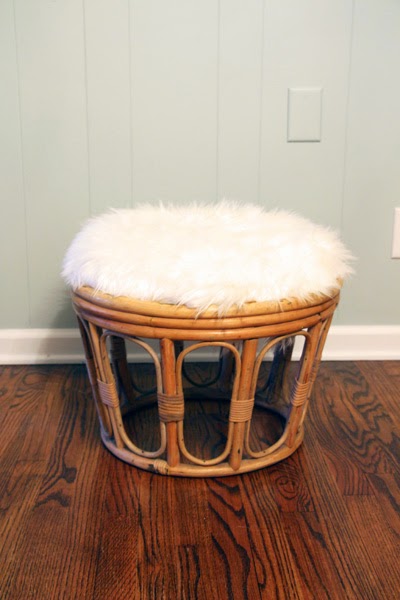
Bamboo and Sheepskin Ottoman

Rather than purchase the matching ottoman when we purchased our swivel glider, I opted to wait and find something else in my ongoing attempt to trade the "matchy matchy" look for a "collected over time" feel.

When I was collecting items for my antique booth, I purchased a bamboo footstool sans cushion.    I wasn't sure exactly how I wanted to go about making a cushion until I came across this picture on Pinterest.


I love the texture and contrast of the bamboo paired with the sheepskin rug.  So I got to work replicating the look.


Supplies:
  • bamboo footstool
  • sheepskin rug (mine was from Marshall's a few seasons ago but Ikea is known for their affordable options)
  • 1/4" thick piece of plywood
  • foam
  • batting
  • spray adhesive
  • staple gun
  • double sided tape (not pictured)

Since the cushion would sit down inside the top edge of bamboo, I measured the inner diameter and then subtracted 1.5" so that there was room for the foam, batting, and sheepskin rug.  Seth cut a circle of 1/4" plywood for me.  I cut a piece of foam about 1" in diameter larger than the plywood, sprayed the back with adhesive, and attached it to the plywood.  I then wrapped it in batting (cut large enough so that you have room to stretch it around and staple in the back) and used my staple gun to secure it to the bottom of the plywood, stretching it tight as I went.  

I decided that I didn't want to put staples through my sheepskin rug and so I secured it using double sided tape.  The rug was longer than I needed but I just tucked it all underneath and used more tape to hold it in place.  

Then, I just popped it on top of the ottoman and it was done.


It ended up being a nice, tight fit so I'm not worried about the fact that it isn't secured to the ottoman.  There are pieces of bamboo underneath supporting it so the 1/4" plywood is plenty thick.


It's so soft and fuzzy.  Perfect for the nursery.