Friday, February 28, 2014

A Few Revelations About My Design Style

Discovering one's style can be daunting.  I know that I've been struggling with it for years.  I like a lot of different styles (modern, bohemian, organic, a bit of glam, a dash of rustic) and when I attempt to mash them together my rooms easily end up looking schizophrenic instead of eclectic.  So then I go back and edit. I take away some color.  I take away some craziness.  And sometimes, I inadvertently take out my personality.

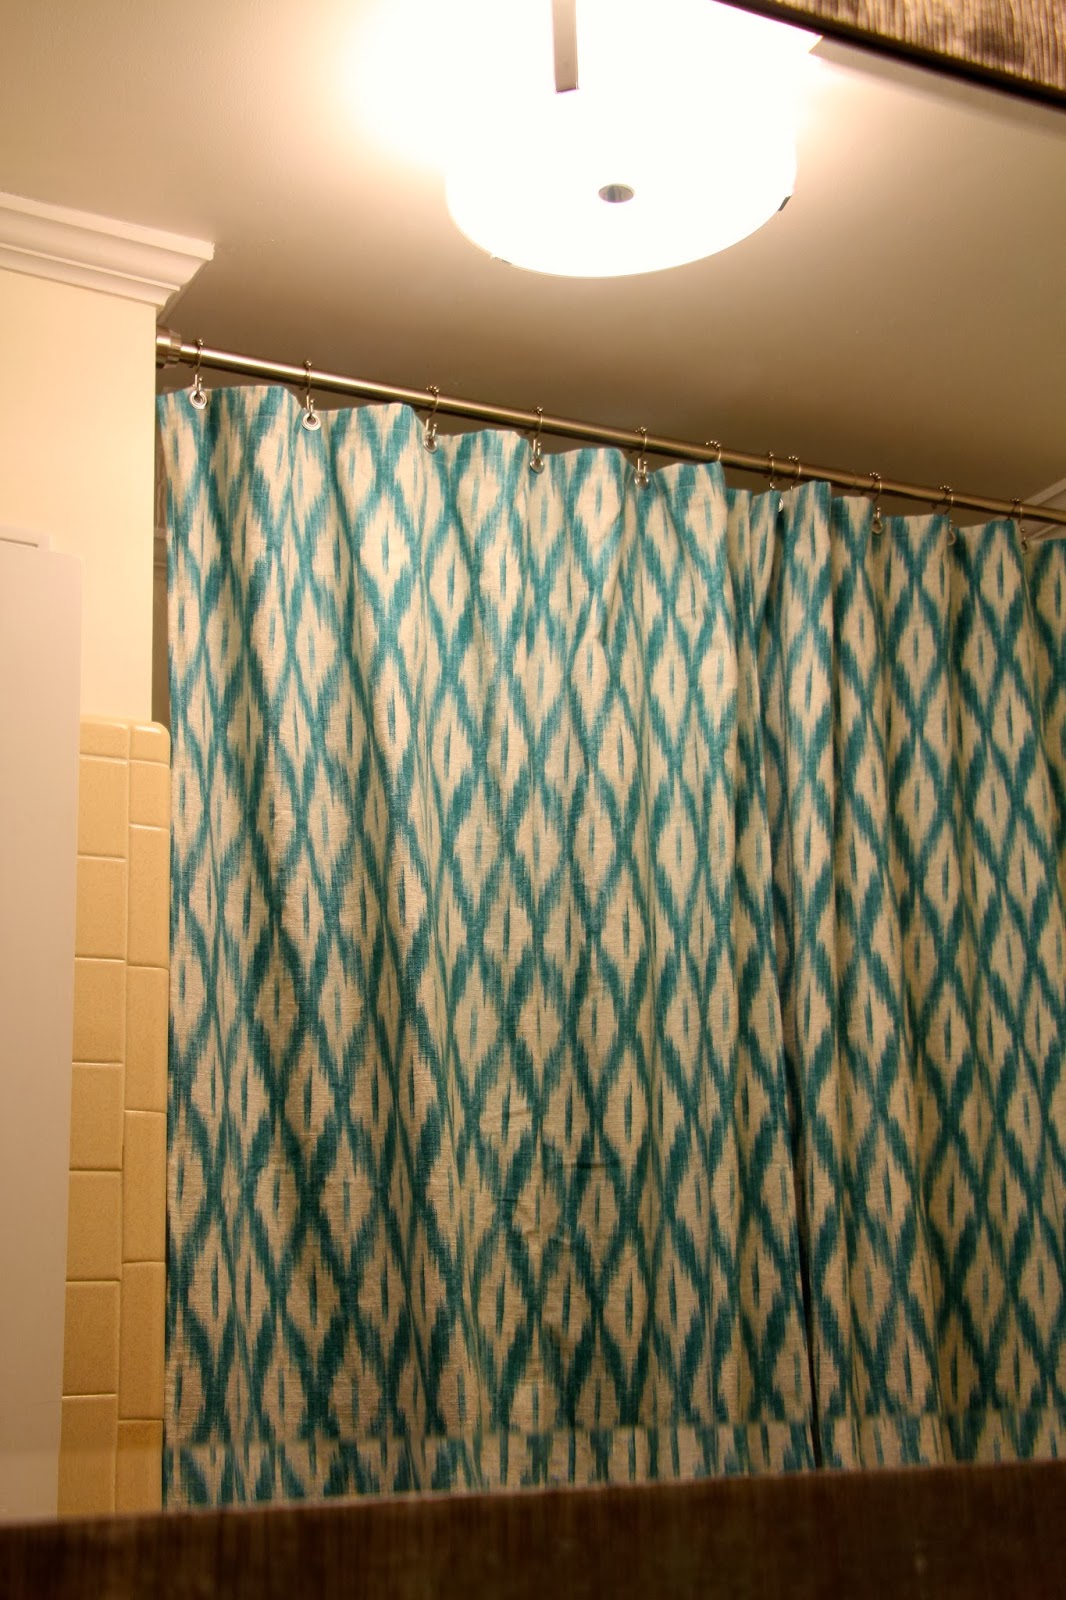
Currently, our living room and guest bathroom are my favorite rooms in the house.

I'm not a designer.  I have absolutely no background in anything creative.  I'm a science major.  My brain just isn't wired the same.  I will never be Emily Henderson and I have to accept that.  BUT…I can gather images that I love on Pinterest and replicate them with my own twist.  I can study and learn from other amazing diy/design bloggers.  And ultimately, my goal is to put together a home that is functional and beautiful in my and my husband's eyes.  It doesn't have to be beautiful to anyone else.  And that's something that I consider too much - what other people will think.  (Don't we all?)


I came across this house tour featured on Young House Love the other day and it made me so happy.  If you haven't discovered her blog (Swoonworthy) and drooled over her house yet, you need to click on the links above.  DO IT NOW.  It's amazing.  Her eye for combining colors is crazy good.  And her mix of vintage and modern is spot on.  I want to move in tomorrow.  

More importantly, I realized a few things while gazing longingly at her home.


Number 1:  I LOVE color.  I do.  As trendy as the neutral, layered look is these days, it just doesn't do it for me.  BOR-ING.  Color makes me happy.  Our first house showcased my love for color more so than our current one.

entryway from our first house

But in some rooms, I took it a bit too far.

I'm not sure I would combine black with orange at all again - just too Halloween for me.  I do still love the green/orange/white combo though.


Number 2:  I love filling up wall space.


A few months back I was agonizing over blank wall space in our living room.  I really wanted to fill it up. But I kept telling myself that it would make the room too busy and it would look awful.  I studied rooms on Pinterest and convinced myself that no one hangs something on every wall.  And so instead of following my heart and installing a fun gallery wall or a large print, I left the wall empty.  And guess what?  It doesn't make me happy to look at an empty wall.  I don't care if a room looks more calming and modern with blank wall space.  I've decided that's not me.  Or I've at least decided that there is a happy medium.


Number 3:  I like convenience.


I need things to be handy.  I need spatulas and olive oil and my coffee pot and my microwave.  And I need them out on the counter.  (I admit, it might help if I had this amount of counterspace.)  I need my remote controls on the coffee table.  I need another roll of toilet paper nearby.  You get the idea.

I'm going to try and focus more on how we live in a space when making future design decisions.  (It's not that I haven't done this before.  It's just that in the past I've convinced myself that a new filing system/rug/piece of furniture will work for us just to find out what I probably knew deep down all along - it won't.  Ultimately, I just need to be more honest with myself.)


Thanks to Kimberly Hughes (and YHL for introducing me to her style), I now have a clearer idea of what I like and what will work for our house.  

I'm going to start making some tweaks around here.  Up first is our master bedroom.  Stay tuned.  Happy weekend!

Monday, February 24, 2014

Guest Bathroom Reveal: Making the most of 1960s tile

We're done with the guest bathroom!  You might remember from my original inspiration post that my goal was to finish by the end of February.  We haven't yet researched into or made final decisions about reglazing the pink tub, but we are going to let that go for right now…a project for another day.

Let's revisit my goals for the space:
(We've accomplished all except the last one.)

Let's also revisit what the bathroom looked like two months ago.


It was virtually untouched.  And this is what it looks like today:


It feels like a brand new bathroom to me.


I find myself checking it out every time I walk down the hallway now.  I was a bit skeptical at first about how much we could really update this bathroom without replacing the tile.  But when a full reno isn't in the budget, you don't really have a choice.


I must say that I am very pleased with the results.  


We installed a small shelf over the toilet which holds a jar of bath salts, extra q-tips and cotton balls for guests, a vase from Target, and a small frame with some familiar art inside.


Do you recognize it?  It's a piece of the wallpaper that used to grace the walls in here.  Just a little reminder of how far this room has come.  I also made the geometric artwork hanging above the shelf.


Here is a close up of the small gallery wall I created.  I made most of the artwork (tutorial post to come).


I also made some artwork for over the hand towel.


New accessories help update the space and tie everything together.


I'll be back soon with sources and artwork tutorials.


Tuesday, February 18, 2014

Guest Bathroom: Vanity Reveal

The vanity is done!  If you remember from my guest bathroom inspiration post, my plan was to build some shelves in the center like John and Sherry did here.  (I'm assuming the open center is supposed to be for a vanity seat?) The shelves would serve two purposes: 1) add extra storage, 2) help conceal the sink plumbing.  Basically following the exact steps that John took, we got to work.

Here is the before shot:


Step one: Determine the depth of your kick plate.  Install two pieces of scrap wood at this depth.  These will serve as the way for you to attach the kick plate later.


Step two: Cut two more strips of scrap wood about 3/4 the length of your lower shelf.  Attach these with wood screws to the sides of your vanity.  This is how you will later secure your lower shelf.


Step three:  Attach your kick plate to the pieces of wood you installed in step one.


Step four: Build and install your lower shelf.  We used 1/2" plywood for the shelf and cut down a piece of scrap wood for the facing.


Step five: Add supports for your second shelf.  Ours is only about 7" deep because the sink plumbing comes down behind it.  


Step six: Build second shelf.  We decided to keep our second shelf removable so as to have better access to our plumbing.  You never know when you might need to clean out that P trap.


Step seven: Liberally apply wood filler to minimize visible cracks and the many imperfections.  (Not a whole lot is square in a 1960s custom vanity that was built in place.)

Step eight: Sand and PAINT!  We used leftover XIM primer and Benjamin Moore Aura interior paint in dark teal in a satin finish.  I lightly sanded with 350 grit sandpaper in between coats.


So much better, right?


The knobs are from Anthropologie and I reused the original hinges.  


Cooter was admiring the new shower curtain.


I am currently working on making and hanging artwork, and the vanity light that I ordered from Lowe's back on the 4th is finally here.  I will be picking it up this afternoon.  I should still be able to achieve my goal of finishing the space by the end of February - woohoo!

Saturday, February 15, 2014

A Quick Mason Jar Pincushion and Blog Improvements

Now that I'm a sewer (yes, I'm using that term very loosely), I needed somewhere to stash my thread and straight pins.  When I saw this tutorial on Pinterest, I knew it would be perfect.


I was able to put it together in less than ten minutes with things I already had in my craft closet.  I used a fabric sample I had ordered from Spoonflower awhile back.  I cut it into a circle and sewed a simple running stitch around it before stuffing in a small piece of foam wrapped in batting.  I placed the lid on the bottom and pulled the thread tight before tying it off.


I didn't hot glue my fabric to the lid and I skipped adding the felt circle to cover the raw edges of the fabric.  If I was giving this as I gift, I might have made the extra effort, but I decided it didn't matter that much to me.  I think it turned out so cute.  When my collection of thread gets larger, I may have to make a second one.

Ok.  On to the second topic for this post…

BLOG IMPROVEMENT!

Long time readers have witnessed at least one "blog redesign" around here.  I put that in quotations because when I "redesigned" the first time, I was still using standard Blogger fonts and layouts.  Although it was definitely an improvement over the original look, the blog was still too generic for my liking.  I knew nothing about HTML or CSS coding and had no idea how to make my blog look the way I wanted it.  

So, I started reading and after some trial and error I was finally able to change my blog title font to something fun and more "me".  You may have noticed that I also found a code to center my blog title, my post titles, and the date of the post.  I also found a code to get rid of the pesky border that Blogger places around photos.  There are still some things that I'd like to improve, but I'm pretty happy with the new design.  

I'm also going to start resizing my photos before uploading them to the blog.  This should help the site load more quickly.  I haven't decided yet if I will continue to watermark them.  

I'm open to feedback and suggestions!

Monday, February 10, 2014

Our DIY Custom Shower Curtain

I'm excited to share our shower curtain with you guys.  It is my first solo sewing project on my brand spankin' new sewing machine.


Needless to say, the seams are not completely straight or pretty.  But, hey…it was my first sewing project.  And it's done.  And it's functional.  And it's pretty unless you get really close up and inspect it. (So if you come visit us and use our guest bathroom, don't get really close up and inspect it, okay?)


I knew from the start of this bathroom refresh that I wanted an extra long shower curtain.  In my opinion, they look more luxurious and make the ceiling appear taller (which is always a plus in a small space).  It's not easy to find 92" long shower curtains, so I knew I might end up having to make my own. I found this fabric online and ordered a swatch.  It's the perfect color, is a nice medium weight, and has a great texture.  For the yardage I needed, it was a bit of a splurge, but to me, it was worth it.

When it arrived, I threw caution to the wind.  Despite the fact that the care instructions on fabric.com said "dry clean only", I washed the fabric in cold water on the gentle cycle.  (It's 100% cotton.  What could go wrong???)  I even dried it (!!!) on low heat.  Yeah - I'm a daredevil.  I checked on it multiple times though as my nerves got the best of me.  Thankfully, everything was fine.  

I smoothed it over with the iron and spread it out on the kitchen floor to cut it.  To ensure I cut it to the proper length, I hung the shower curtain rod and shower curtain rings and then measured from the rings down to the floor.  The finished length needed to be 92".  I cut two 96" pieces (allowing for an extra 1" at the bottom and 3" at the top for hemming).  Why did I need two pieces of fabric?  Shower curtains need to be around 72" wide and unfortunately, you can't get fabric that wide.  So, you must use two panels and either sew them together in the middle or do what I did (see below).


I tackled the sides first.  After folding my fabric over twice to get a clean edge, I ironed it down.  I used straight pins to secure it every 8-10" and then I started to conquer my fear of sewing.  


I did the same thing at the top and bottom of the panels but left extra room at the top for my grommets.  To keep their versatility, I chose not to sew my two panels together.  I can repurpose them as curtains or keep them open for this look in the future.


So as not to push my luck with my new sewing machine, I decided to add grommets instead of attempting button holes.  You can pick up a grommet kit for around $10 at your local craft store.  I needed 12 grommets, so I had to buy an extra set of grommets since the kit came with only 10.  


I initially planned to install six grommets on each panel, but then I decided I would overlap the panels in the center to minimize any gapping between them.  So I installed six grommets on one panel and seven on the other.


My decision to add an extra grommet meant that my grommets could not be spaced the same on both panels (they're nine inches apart on one panel and seven and a half on the other), but it's not really noticeable (remember - no close up inspections allowed).


Installing grommets is pretty simple.  Measure and mark where you want them.  Cut out the circle of fabric.  I used a combination of my X-Acto knife and my fabric scissors.


The grommet kit comes with the two tools that you need to install your grommets.  Start by placing the grommet setter on a hard surface.


Then place the eyelet side of the grommet on top of the setter.


Push the center of the eyelet piece up through the hole in your fabric.


Set the washer piece of the grommet (with the prongs facing down) on top of your fabric.


Then set the anvil on top and use your hammer to secure your grommet.


It took me about eight solid hits to get them super secure.


Aren't they beautiful?  I love the touch of classiness they bring to our new shower curtain.


You'll have to excuse the wrinkles.  The steam function on my iron isn't working.  


Do you like our new overhead light?  I'll have a proper post for you when we get the new vanity light up.  We purchased one weeks ago, but after hanging the mirror we realized that the scale was wrong. The light we chose looked teeny tiny next to our huge mirror.  I ordered a larger one last week but it hasn't even shipped yet.  I'm hoping it will ship this week and get here quickly.  Stay tuned for a post about our vanity update.

Have a great week everyone!