Showing posts with label string art. Show all posts

Sunday, March 10, 2013

Hallway Gallery Wall Dissected

As promised, I will take you through our new hallway gallery wall piece by piece.  Some of the art is purchased or printed and some was made by yours truly.


1.  I purchased this plate from Anthropologie.

2.  This art was a free printable from Sarah Dorsey's blog.

3.  I made this by printing a silhouette of the state of Illinois, cutting it out, tracing it onto some scrapbook paper, cutting that out, and attaching it to some white card stock.  The key is from our first house and I glued it to the spot on the map where Quincy (the city we lived in) is located.  I painted the white mat a dark gray with some acrylic paint that I had on hand.


4.  This string art was inspired by project #118 in John and Sherry's book.  I first traced the Auburn logo onto some navy blue card stock.  Then, I used a push pin to make holes along all four sides spaced every 1/4".  


I used a ruler to visually join the corresponding holes (ie the ruler was lying diagonally across the paper connecting the 1st hole on the left side with the 1st hole on the bottom, then the 2nd hole on the left side with the 2nd hole on the bottom, etc).  This allowed me to make holes in the appropriate spots surrounding the logo.  Did that make any sense?  I then used two colors of embroidery thread and started stringing them through the holes.  I started with one color, skipped every other line and then went back with the second color.


Here is a picture of the back of it.  (This was before I figured out that there was a better way to string it so as not to waste so much embroidery thread.)  I numbered some of the holes so that I would know when to thread them.  It was definitely a time consuming project.


5 & 6.  Google helped me find the sousaphone and clarinet silhouettes, and then I just printed them onto some burlap.  Seth and I were both band geeks in high school and proud of it.  One of us played the clarinet and one of us played the sousaphone.  I'll give you one guess as to who played which instrument.  To print on burlap, I used the technique described here.  There are a ton of tutorials on how to do this and most of them include ironing your piece of burlap onto freezer paper before printing.  The tutorial I used did not use freezer paper.  I didn't have any and I like to keep things simple around here.


That being said, you need to make quite certain that your burlap is secured all over the printer paper.  If it is not, the burlap will shift during printing and the image will print crooked.  I guess that is where ironing it down onto some freezer paper would come in handy.


See what I mean?  Third time's the charm I guess.

7.  This is a print that Seth has had for years.  We just placed it in a nice crisp white frame with a mat.  I love the white barn and how colorful it is.


8.  I painted this quote onto a canvas using a simple transfer technique.  After I printed off my words, I flipped them over and traced their outline with pencil making sure to create a heavy line.


I then flipped them back over (front side up now), placed them where I wanted them on the canvas, and traced their outline again.  This left me with a very light pencil outline on the canvas that I could follow as I was painting.  (You don't want me to free hand anything.  Ever.  I promise.)


For the lobster, I just cut out his silhouette, traced him onto the canvas, and filled him in with paint.  If you don't know where the quote is from, you haven't watched enough of the greatest sitcom ever produced...Friends.  The clips below explain it.  Just make sure to cut it off before the horrible credit music comes on at the end (it was added by the person that put this video together).


Moving on to the other half of the wall.


9.  My inspiration for the map art was this piece that I found on Etsy via Pinterest.  My mom picked up a few state maps at the Tennessee welcome center one time on their way home from visiting us in Illinois.  I think they were for a class project (she teaches elementary school).  Serendipitously, she had one left over.  For this project, I decided to use a pig silhouette versus hearts like in the inspiration piece (Seth is a swine vet for those that don't know so pigs are a major part of our lives).  Again, I just used google to find a pig silhouette that I liked, printed it off, and traced it on the map around the cities that I was cutting out.


I cut out around the city where we met, the city we got married in, and the city where we currently live (Knoxville, Maryville, and Jackson respectively for those of you who are curious).  Then I attached the little piggy maps to some navy blue card stock and added the words "hello.", "i do.", and "home." underneath them.


I've also seen people use the words "we met", "we married", and "we live".  You could also use the cities where you and your spouse were born and then the city where you met or where you got hitched.  The possibilities are endless.


10.  I quickly threw this together in Word.  I was going for an ombre effect and used a verse from the Bible (Psalm 46:10a) that helps me remember to slow down when I get caught up in life.  It may get tweaked at some point.  It's a bit difficult to see the "be" part of the phrase.

11.  At the start of this gallery wall I knew that I wanted a deep canvas that I could put on hinges to cover our thermostat.  This one was perfect.  I painted some circles in various colors on it and called it a day.  For now.  I was inspired by this amazing piece by Jesse at Cape 27.  Mine did not turn out as nice as hers.  I think the orange is throwing mine off.  It will definitely be tweaked or completely redone in the future.


I've seen some people on Pinterest commenting that a canvas covering your thermostat will affect its temperature reading.  So far, we haven't noticed any problems.  


12.  My version of DIY paint chip art.  Again, something that may get replaced in the future.

13.  For those of you that don't know your Central American countries, this is Costa Rica. (I wouldn't have known either and I've been there...whoops.)  The heart marks the spot where Seth and I honeymooned.  It's Arenal.  I highly recommend a trip there.  I have been wanting to go back ever since we left.

14.  This is another plate that I purchased from Anthropologie.


So there you have it.  Our new hallway gallery wall.  I hope it inspires you to take on an art project or two.  Even if they don't turn out how you had first envisioned (like many of mine), making some of your own art will save you quite a bit of money (and you can always upgrade as your pocketbook allows).  I'm still saving up for my first Michelle Armas purchase.  One day, I hope.  One day.

Have any of you tackled DIY art?  Did it turn out exactly as you had hoped?  I'd love for you to post some pictures in the comment section!

Friday, November 16, 2012

DIY Dining Room Art

We have a lot of wall space in this new house, which may sound like a good thing at first, but when you are trying to fill it up and make it all "homey" it can get pricey.  Trying my luck at making my own art was an easy decision.  That being said, some of us are gifted in drawing and painting and some of us are just...not.  God gave me a brain for science and not for the arts.  I've tried some abstract paintings in the past and they did not turn out well.  I may try again some day, but for now I'm sticking to typography and other "crafty" art projects.  

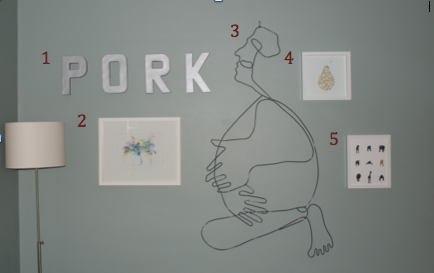
First, let me entice you with a picture of the finished art wall.


The object on the left side that got cut off is a lamp.  I wanted to give you a close look so it's other half was sacrificed for this pic.  I'll take you through the pieces one by one.

(Ahhh...there's the lamp)

  1. These are cardboard letters from Hobby Lobby that I spray painted with metallic silver paint.  Many people have done this all in the name of trying to "steal" the look of the famous Anthropologie zinc ones.  Yes, these are roughly a foot tall and Anthro's are twice that but mine were $2.49 each (plus some spray paint) and Anthro's are $98 each.  Yeah, I'll take the small cardboard version thankyouverymuch.  I went back and forth about what to spell out...yum?  eat? drink?  dine?  So many options.  I eventually settled on pork.  For those of you that know Seth and I personally, no explanation is needed.  For those of you that stumbled across this blog and are wondering why pork, I'll just say for now that we have ties to the pork industry.  
  2. This is actually not a DIY project.  I purchased this print awhile back from 20x200.com.  Their motto is "art for everyone" with 8x10 prints starting at just $24.  I definitely recommend checking them out.
  3. Again, this is not a DIY project.  It is the "Wire Guy" from CB2.  I had been admiring him for awhile and just before we moved, he went on sale so I snatched him up.  He just looks so content with what I imagine is a belly full of delicious food.  Perfect for a dining room, right?
  4. This piece is some pear string art that I whipped up.  I was inspired by this.  I'm thinking that a letter or number (or ampersand like my inspiration) definitely has a bit more impact.  The pear kind of looks like a blob.  Oh, well.  I'm leaving it alone for now.  (Tutorial below)
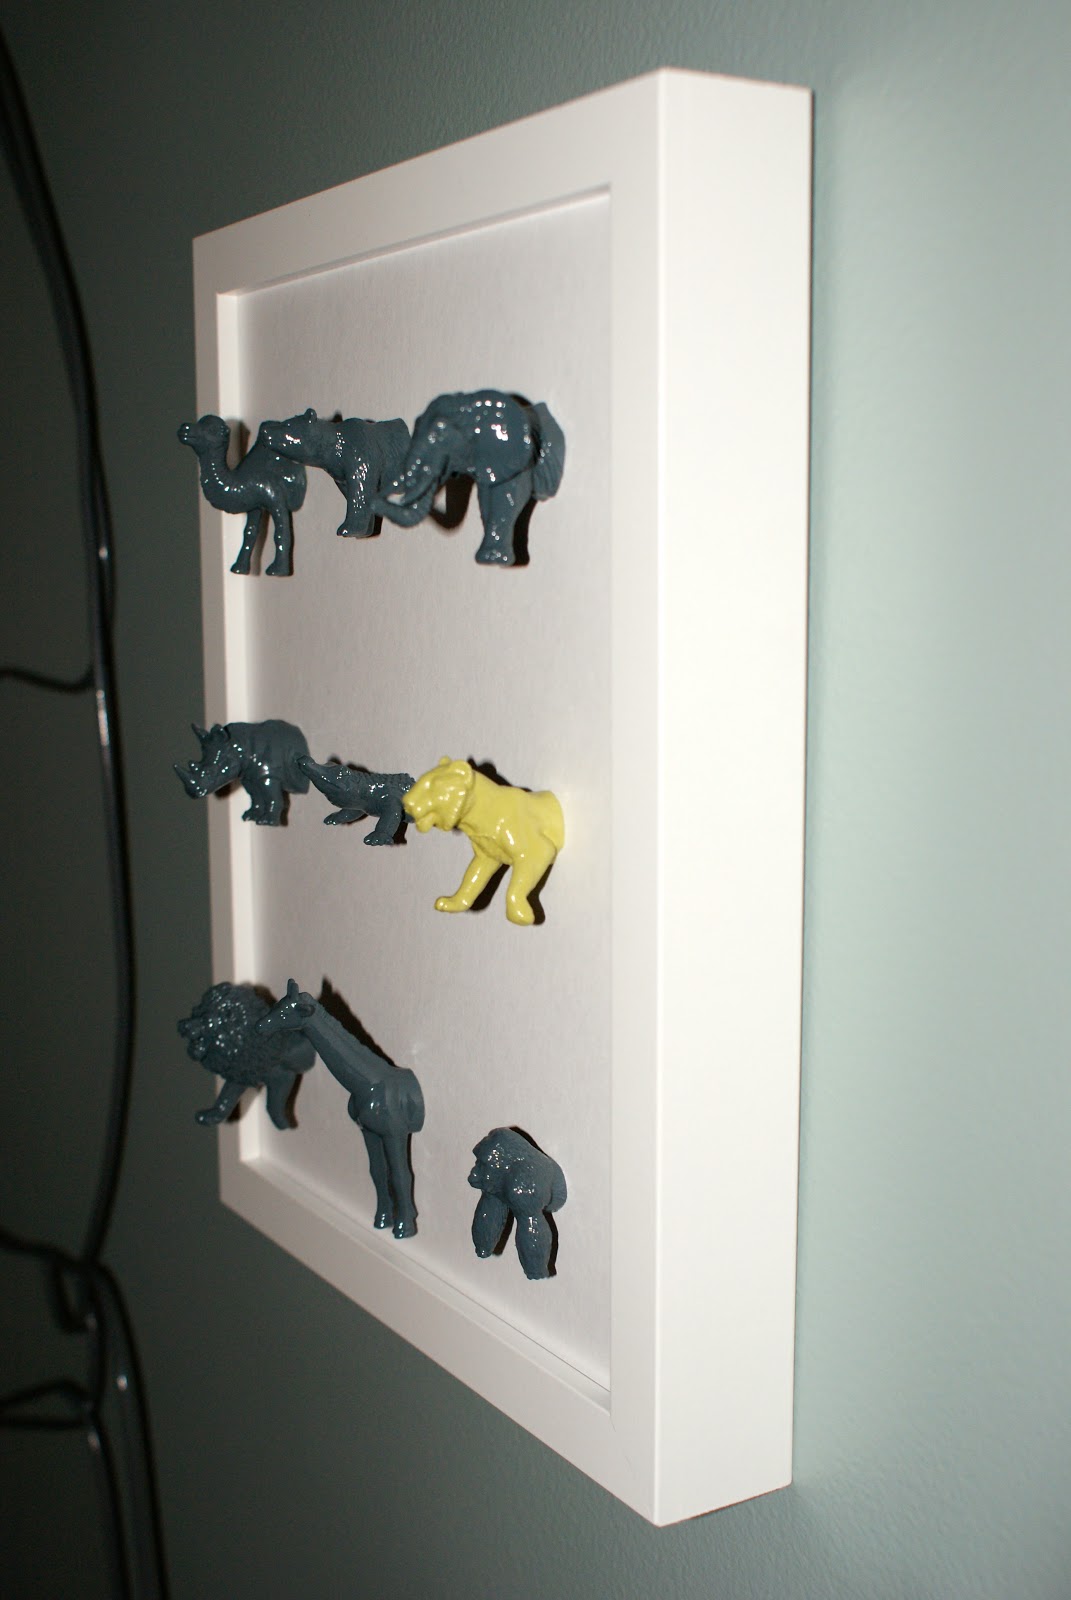
  5. I am in LOVE with this project.  Those are spray painted, mounted plastic animal heads.  Yaaaah!  I'm giddy over it.  Mandy over at The Haps is a genius.  You may think I'm weird but as you can see I'm not alone.  Jessie at Cape 27 also made one for her daughter Zoey's room and Jessie claims to love it more than Zoey.  (Tutorial and close ups below)


Now for the tutorials.  The pear string art is pretty straight forward.  You'll need:
  • a picture frame
  • a thin piece of wood cut to fit your frame
  • some embroidery floss, string, whatever you'd like
  • some small nails
  • a hammer
  • a silhouette/outline of your choice


I spray painted my piece of wood white after it was cut down to size and sanded lightly.  I googled pear silhouette and saved one that I liked.  I enlarged it in word and printed it out.  After cutting it out carefully, I used some tape to secure it to the wood trying my best to center it.  Then I started hammering in tiny nails around the silhouette.  I used quite a few nails, probably one every centimeter or so because my shape was curvy and I didn't want the curves getting "cut off" when I started stringing and becoming huge angles.  A pear is supposed to be curvy after all.


Once all of the nails were in place (I had a couple that kept wanting to pop back out), I used my string to outline the shape first.  Then I started filling in by randomly stringing across the image.  I just stopped  and knotted off the string when I decided it was done.  


I used some jute twine that I had on hand for the stem (after I untwisted and separated to get a thin strand).  And that's all there is to it.


And now for the animal heads....


For this art project you'll need:
  • a picture frame
  • cardstock
  • super glue
  • some plastic animals
  • spray paint
  • a knife
  • a cutting board
  • a pot with boiling water (optional)

After a lot of searching (Wal-Mart, Target, The Dollar Tree, Kroger, Joann's) I finally found a pack of plastic animals at Hobby Lobby.  They actually came in a fun tube that had a globe on top that you could spin around.  I am easily entertained.  And they have millions of these tubes with all sorts of different creatures inside of them.  I believe it was around $8 for the tube with the twelve jungle animals in it.  I also used my weekly 40% off coupon so it was probably just over $5 with tax.  Not too bad for a dozen safari animals.  After reading Mandy's tutorial and her comment section, I decided to try boiling the animals in water for a bit to soften them up before attempting to cut them in half.  


This worked really well.  I think I boiled them for about 5 minutes and the knife sliced through them like buttah (well, almost).


Is anyone a bit disturbed by this?  If so, I apologize.  I would never do this to a real animal. I promise.  And besides...a real jungle animal wouldn't let me close enough to try anyway. I jest.  I am not about to go roaring through the jungle wielding a large knife looking for victims.  Don't worry.


I cut nine of the twelve animals for this project and plan to save the other three for something else.  I then moved the heads outside to begin spray painting.


The lion's mane was weighing him down a bit so I used a couple of push pins to support him.  


Seth actually suggested picking out one animal to spray paint a different color and I chose the tiger.  War Eagle!  :)


I gave them multiple thin coats until they were fully colored.  I let them dry overnight and then mounted them to a piece of cardstock with super glue.  


They rested laying down flat for another 24 hours before I got the courage to put them in the frame and hang it.  I still have a fear that one of them is going to take a nose dive one day.  Super glue don't fail me now.  Seth has a fear the someone is going to brush up against them and knock one off.  I guess we'll see which (if either) happens first.  


Some of you out there might be wondering what I did with the animal butts.  I saved them, of course.  Multiple readers on Mandy's blog asked her what she was doing with hers and many even gave suggestions from making animal butt magnets to repeating the same art project with the butts and hanging it in the bathroom.  One reader even suggested including a reference to wiping.  I am not sure what I'll do yet, but I definitely laughed out loud and LOVED the cheekiness of the animal butts/don't forget to wipe your butt thing in the bathroom.  


I'm quite pleased with the way the projects turned out.  They were fairly inexpensive, they are filling up some wall space, and they are personal since I made most of them.  Check, check, and check.  Now on to filling up the walls in all the other parts of the house.

Has anyone else attempted their own art project?  How did it turn out?  Any other suggestions on what to do with the animal butts?