Friday, November 28, 2014

Kitchen Sneak Peek

The lack of posting lately is mostly due to kitchen progress!!!  We are finishing up the cabinet painting this weekend!!!  I cannot wait to get the kitchen back together.  But, we are going to make ourselves wait patiently for at least 5 days before rehanging the doors just to make sure the paint has fully cured.  There is nothing worse than ruining your hard work with a sticking cabinet.


We decided to go with all white cabinets.  Simple, easy, and clean.


I am already so happy with how much brighter the kitchen seems.


I can't wait to get these out of the office/project room and back into the kitchen.


I hope to have the after pics for you in the next couple of weeks!  Hope everyone had an amazing Thanksgiving!

Wednesday, November 19, 2014

Copycat Cage Light Sconces

Seth and I recently put together a couple of sconces for the dining room.


We essentially followed this tutorial from Nalle's House, except that we made our own brackets since we don't have an Ikea close by.

The cage lights are from Target.


As for the brackets...

We started by cutting a 10" piece and a 12" piece for each bracket from a 1x2.

We attached the 10" piece (the top of the bracket) to the 12" piece (the back of the bracket) with a screw leaving 1" of space visible at the top of the backside of the bracket.

The top one is oriented in the correct direction in this pic.

*Note: We later had to go back and remove this screw when we realized that it was in the spot where the hole for the cord needed to be drilled.  We replaced the screw with a couple of brad nails.

Next, we measured and cut the pieces for the braces.  We mitered both ends at 45 degrees as shown below.

We attached those with brad nails and then drilled holes for the cord.  We then applied a coat of Minwax's golden pecan stain that we had on hand.

I decided that it was too orange and so we added a coat of Rustoleum's paprika stain.  You can see the difference below on the front bracket - the left side has the paprika applied.

To attach the cage light, you have to cut off the plug so that you can feed the cord through the bracket and then rewire a new plug on the end.  We used this one.  Seth did the wiring so I don't really know how you do it.  Sorry.

Then we just used some 3M picture hanging strips to hang them on either side of our mirror.


The stain that we used on the brackets ties into the bamboo roman shades and the cage design picks up on the design of the overhead light.

Don't judge.  The drawers and kitchen items on the table are a sign of progress in the kitchen!

Just a few more projects in the dining room and it'll be complete!

Thursday, November 13, 2014

Natural Fall Front Porch

You guys got a sneak peek at our fall front porch in this post, but I wanted to share more photos after adding a couple of corn stalks to complete the natural "harvest" look.


I stuck to a simple assortment of pumpkins, gourds, mums, and the corn stalks this year.


The spring/summer pillows went into storage and these green striped ones got the job for the fall season.


I looked for white mums, but couldn't find any, so I chose yellow and orange varieties.


I just love the non-traditional colors that pumpkins come in these days.


And with those new porch columns, I'd say our house is looking pretty good these days.  Now we need to landscape and fill up our empty front beds next spring.

Monday, November 3, 2014

Building Porch Columns Part II

If you missed part I, you can find it here.

Next up for our new porch columns was adding some trim.  This actually turned out to be the most time consuming part for us.  We went with a simple design and used 1x4s to form squares at the top and base of our columns.


We started with the bases.  We cut the side pieces to the depth of our column first and then measured so that the front and back pieces would overlap the ends of the side pieces.  This ensured that there wouldn't be any visible seams on the front of the columns.

We attached our trim with a brad nailer.  For the back pieces, we had to notch out a spot at the bottom of the trim piece for the wedge anchor and hex nut.  (The notch did not go all the way through to the outside of the trim piece.)


We used shims to try and get our trim as square as possible.  (Yes - we are not professionals and there were large gaps.  Caulk will fix that later.  Just wait.)


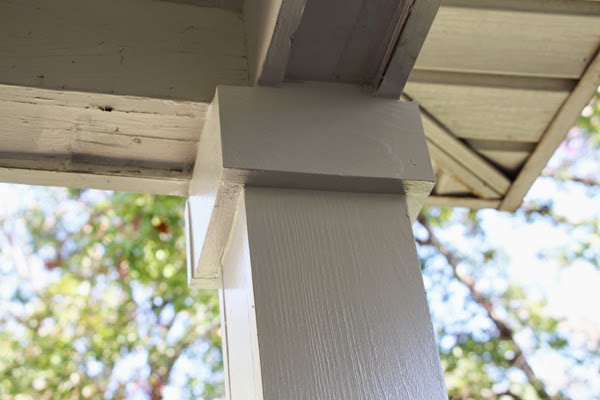
The front and back trim pieces for the top were also cut from 1x4s.


However, the side pieces for the top needed to be taller to fill the inset area in the porch header so they were cut from 1x6s and trimmed to the correct height.


At this point, we let our columns dry out for six weeks before we caulked, primed, and painted them. It is super important that you let treated wood dry before painting it or your paint will not stick.

Next, we liberally applied paintable interior/exterior latex caulk.


We made sure to fill every seam.  And we probably should have done a second round of caulk to really hide them.  But we're impatient.


We primed them with one coat of Valspar's exterior high hiding primer.  Then we applied two coats of the same white paint the we used on our sidelights, Valspar's Duramax Exterior Semi-gloss paint in Ultra White.


Again, we should have spent a little more time on the sanding and caulking steps but most of the issues are only super noticeable close up.


I am so excited to check front porch columns off our project list!


We are now on the hunt for new sconces and then the front porch makeover will be complete. Let's look back in time...


(Why haven't I posted about eradicating our English Ivy yet?  I don't know.  
I will have to do that.)

I definitely like the more modern vibe that the columns, shutter, and front door give off.  I certainly don't miss the dark green.