Friday, December 28, 2012

Office Inspiration Board

When I spotted this inspiration board that Ashley from Seventh House on the Left made, I knew it would be a perfect addition to our office and I had just the place to hang it.  I had been ignoring the large blank wall to the left of my desk until recently when I entertained the idea of some sort of art piece for it.  I really get tired of framed art on every wall though, so I try to switch it up with unframed canvases, mirrors (I have an antiqued mirror project in the works so stay tuned), cardboard animals, spray painted cardboard letters, and even plastic animal halves.  I'm open to most anything that is different and takes up wall space.  I've just never been fond of having framed pictures of myself in every room.  I do appreciate the sentimental value of pictures and the memories that they invoke, however, and so we do have a few in the bedroom.  I just don't want them in every room of the house.  All that to say that I was excited by the possibility of a DIY project that would take up wall space and would be something different and functional.

I started with a 50% off open frame from Hobby Lobby.  It used to be silver but I spray painted it a glossy white.


The cardboard from Fred the moose's old frame fit perfectly into my new frame so I removed the orange fabric and started securing the cork squares to it.


Originally, I didn't purchase a roll of cork for two reasons.  One - I thought I was going to follow in Ashley's footsteps and paint the cork with chalkboard paint so the lines wouldn't show.  Two - I was very concerned about how thin the cork rolls are and I didn't think they would hold a push pin successfully.  BUT, when I finished piecing together the cork squares, I realized that the lines between them were very obvious and ugly.  I decided against the chalkboard paint because I wasn't in love with bringing black into the room and because I didn't envision myself using it that much anyway.  So, I tried spray painting the cork blue.  


This is what it was looking like after one thin coat.  I could tell it was not going to work.  So off to JoAnn's for a roll of cork.  


I used spray adhesive to attach it to the cork squares and popped it into the frame.  I decided to leave the cork au naturale for now.  The next problem was finding a way to hold it in the frame.  I used four random L-shaped metal bracket-like things (uh...what?) that I had on hand.  No idea what they are called or where I acquired them.  I also attached a saw tooth picture hanger.  


Then I used a hefty drywall anchor and screw combo (our favorite for hanging heavy items) and popped her up on the wall.


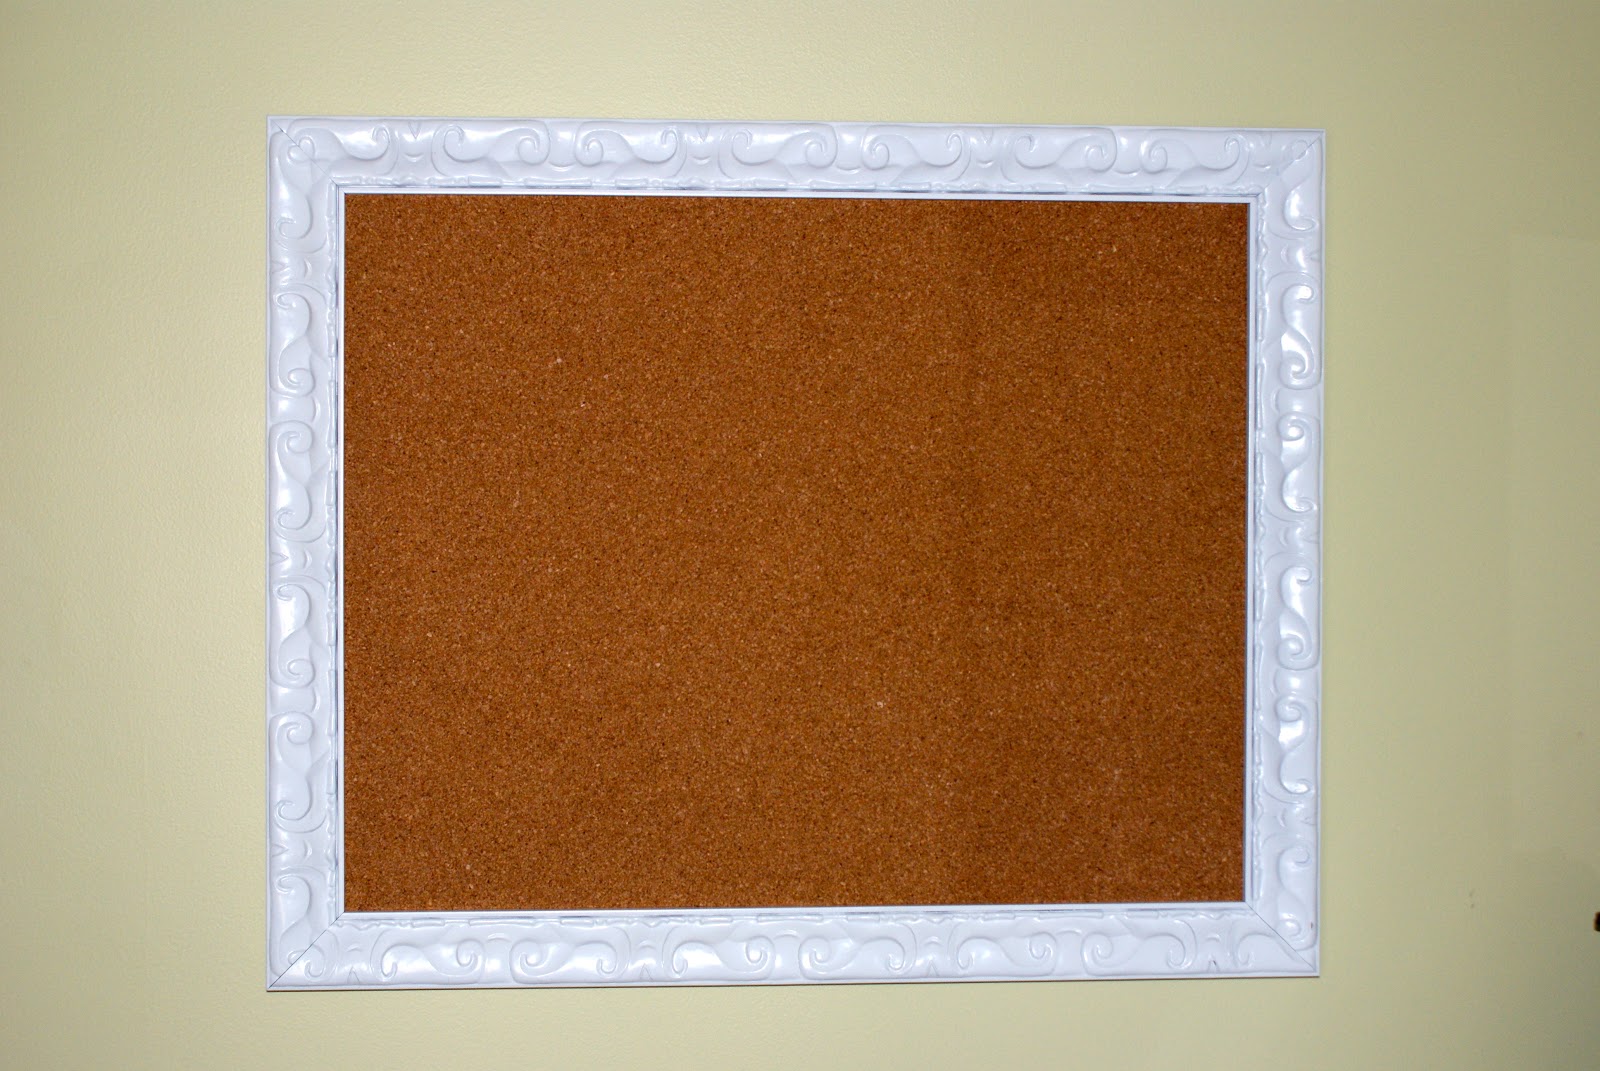
I am loving the way that it turned out.  


I am definitely a tear-pictures-I-like-out-of-magazines-and-stash-them-everywhere kind of girl so this board is helping me keep my freshest inspiration photos right at hand.  It is also serving as a gentle nudge to get started on new projects each day.

And didn't I promise you a picture of our new couch?  Without further ado...


I am in love with her clean, modern lines and her textured gray upholstery.  I'm so glad she is finally ours.  :)

Tuesday, December 25, 2012

Christmas Garland

I meant to post this last week, but things got crazy at work and I slept during most of my free time.  But better late than never, right?  A couple of weeks ago, I made some garland for our fireplace.  It was very simple and cost about $1.50.  First, I debated about what I wanted my garland to say.  I mulled over some different ideas such as "merry & bright", "o holy night", "merry christmas", etc, but I eventually settled on "o night divine".  I made a template out of card stock and then used it to cut 12 pennants (one for each letter) out of some burlap that I had on hand.


I left two tabs at the top of the pennants to use for securing them to the twine.  I then typed out my message in word and printed out the letters.  I cut them out, traced them onto different colored felt, and cut them out of the felt.  (There may be an easier way to do this.)


I used hot glue to first glue the felt letter onto the burlap pennants and then to glue the pennants onto the twine.  


I found the printable to the left of the fireplace here and had it printed at Office Max. Again, you'll have to excuse the nasty cream trim that we haven't been able to do anything about quite yet.  


Yes, of course the animals have stockings.  And they happen to spell "car".  Or "arc" or "rac" I suppose.


Even Armando, a gift from my late grandmother, got spiffed up for the season.  I hope everyone had an amazing day.  Merry Christmas!

Thursday, December 13, 2012

A Little Switch-a-Moo(se)

Can you tell that it's getting more and more difficult for me to come up with catchy titles for my blog posts?  Guess you're stuck weathering this case of "title block" with me.  Do you remember the moose (Fred) that I posted about here?  Good.  Well, he got a little bit of an update or a switch-a-roo moo(se) if you will so indulge me.  After living with him in the silvery gold frame with the orange fabric for awhile, I decided that it just wasn't working.


First, I think the frame was too fancy for him.  I realized that Fred is more of a rustic kind of guy.  I mean, he is a moose after all.  Secondly, I think the orange was a bit much.  I do plan on incorporating some orange into the room via little accents, but Fred's backdrop had been flying solo and sticking out.  And while the orange backdrop might make a reappearance in the future, I decided that I wanted to change it up for now.

Hobby Lobby is having 50% off their open frames this week (the ones without a back on them) so I snatched up a larger version of the one I used for my earring display.  I couldn't find the perfect green fabric at Hob Lob so I ended up at Joann's.  And there I found it.  A nice cotton in a beautiful celery green.  I cut a piece of cardboard to fit my new frame, wrapped the fabric around it, secured it with some double sided tape, and (since my frame had no way to hold my back in place) used some packing tape to secure it.  Fancy, huh? That is how we roll around here.  


I think he looks a bit more at home.  And I like the contrast between the dark wood frame and the crisp white fireplace.  However, I am now debating spray painting it a nice dark gray.  Our gallery wall around the television contains all black frames, the new sofa is dark gray (which I owe you a picture of), and my plan for decor above the sofa includes more gray.  Hmmm....what do you think?  I am also in love with his new background color.  It is less jarring than the orange.

Do you agree that Fred looks more at home now?  Or do you miss the orange?  Is anyone else a constant house-tweaker?  What have you switched up lately?

Wednesday, December 12, 2012

Auburn Printable

A couple of weeks ago, I made some simple Auburn art to go behind an acrylic frame that I picked up at TJ Maxx.  I am pleased with the way it turned out.  I am a huge Auburn fan (and alum), but I don't want my house to scream that.  I think this is a more subtle way of reminding people that they are in Auburn Tiger territory without covering every inch of available wall space in Auburn paraphernalia or painting every room burnt orange or navy blue (although those are two beAUtiful colors - get it?  yes, I'm cheesy like that).  I am trying to stay away from over the top and tacky as much as possible.  :)

I know that as far as football goes, Auburn did not have a great year.  And that is an understatement.  But a true fan's loyalty does not waiver when the going gets tough.  So I know you Auburn fans out there will still appreciate this.


I'm still working on styling the shelves.  And I guess I should have moved those glasses in the first photo.  Seth and I are still slowly building up our fine china collection so I had them out as I was browsing Bed, Bath, and Beyond's website to try and find the correct match.  Maybe that's sad that I don't remember their name, but I have other more important things taking up brain space right now.  Oh, and just to put it out there - we try to actually use our fine china.  We wouldn't have registered for it otherwise.  Right now I've mixed it in with some holiday dessert plates on our dining room tablescape and I love seeing it out every day.

Click here to download the printable
It is designed to fit in a 4x6 frame and is free for personal use only.
Thanks and enjoy!

Wednesday, December 5, 2012

Making Your Television Blend In

When we were still living in our first house, I came across the picture below (in Better Homes and Gardens magazine, I believe, although I cannot find it on their website now) and was inspired to create a gallery wall around our television to help it blend in.


I loved the black and white silhouette look so after mulling over some options, I decided that the furry kids would make great subjects.  While Seth used treats to coerce them into nice poses, I snapped some photos.  I enlarged the photos in Word and then printed them off in black and white.  I cut out their silhouettes and traced them onto black poster board.  I taped them onto white poster board and popped them into some black frames that I found at Wal-Mart.  Since we only have the three kiddos, I also decided to make a silhouette of the state of Tennessee (since Seth and I had both grown up here), a couple of small calla lily silhouettes (we had yellow ones at our wedding), and a hummingbird silhouette from a pic that I snapped during our honeymoon in Costa Rica.  This is the result.


I really liked how the silhouettes drew your eye upward and away from the ugly black box. Now I realize that I probably should have hung them a bit lower and closer to the television because they look pretty disconnected from it at this height.  

This past weekend, Seth got motivated to mount our television.  (It took some time and LOTS of furniture rearranging, but we have finally settled on a living room layout.)  I liked the idea of mounting the television just above the media console for a cleaner, more polished look.  I also knew that I wanted to use our silhouettes again to create a gallery around the TV.  Here is the before...


A big blank wall made the television stick out like a sore thumb.  (The cream door, crown molding, and plan wooden knobs on the weird storage cabinets are on our to do list.)  This time, I decided to leave the hummingbird out of the mix since multiple people could not tell what it was when they came over to our house in Illinois.  Here is what we came up with.


After hanging the kids, the lilies, and TN, there was a bare spot that needed a little something so I simply printed off a large K (in the font Optimus because I wanted something simple and clean-lined) and framed it.  


I'm quite pleased with how it turned out this time around.  I think hanging the silhouettes in a tighter group around the television created a much better result.  I'm still tweaking the top of the console and I'd like to replace the brown Ikea storage boxes one day.  I'm slowly learning that everything doesn't need to be perfect right away and that there is something to be said for letting a room evolve over time.  I'm not a patient person so this is a challenge for me.  

Our couch is finally being delivered today after a 9 1/2 week long wait.  I am super pumped.  I'll snap a picture to share with you later this week.  I hope I haven't built it up in my head too much during the wait.

How do you guys help make your television blend in?  Maybe you don't worry about it at all and prefer to let it be a focal point.  Maybe you have a nice armoire with doors that you shut when the television is not in use.